
In this article, I continue my series on methods for Resident Engineers to get a new project started.
So far, we’ve done a lot of cursory job review & walked the site. Last week, we looked at various ways of implementing your open issue tracking system to house all of your observations, questions, issues review notes & comments to keep them organized and trackable. Now let’s level up, dive into the plans and start getting ready for the season.
I mentioned in my previous posts that I like to divide my initial job setup into 3 Big Chunks:
–Detailed Plan Review
–Existing Conditions Documentation
In this article, we are going to take a look at some key components of a detailed review of the plans
Detailed Plan Review
So, in your first round of drawing review, you were more-than-likely flipping sheets, looking for major work items, getting an idea of the lay-of-the-land. Now that you’re been engaged with the project and spent some time in the field, you have lots of new rabbit holes to explore.
Have at it. Dig in.
I really think the key to a great plan review is curiosity. You HAVE to have a desire to be the smartest guy/gal on the project. You have to want to know the answers to ALL the questions. And I say that, not with ego or bravado, but with intellect and professionalism.
Take it upon yourself to really want to know & understand ALL of the facets of your job. Try not to leave any stones unturned. Drive yourself hard to REALLY understand what is being built. Look for gaps. Find questions that haven’t been asked or answered yet. Challenge the plan assumptions. Ask yourself why the Engineer did it “this way” or “that way?” Would YOU do it that way?
Grind. Work. Dig. Be tenacious in your effort. Once the job gets rolling, you won’t have time to sit and study the plans, you’ll have too many other things to take care of. Make judicious use of your time now.
Plan Review Focus Areas
There are some extremely important areas of the plans that I gravitate towards. You might be surprised to hear that when I attack a set of drawings for the first time, I don’t take the obvious route like some: I’m not worried about the Maintenance of Traffic, I don’t need to dive into the bridge plan details or the cross sections at this point, it’s too early in the review to waste time looking at specific plan items, we need to look at other things first.
These ideas are some of the sharpest saw blades in my toolbox. I’ll loan them out, you just need to make sure that you bring them back
1. Review the Soil Borings
It has been my experience that, one of the often-overlooked sections of the project plans that engineers ignore are the soil borings. Think about it: The borings are, well, boring (I couldn’t pass that up…).
Don’t be that engineer. The borings contain some of the most vital information that you need to get your arms around before you review anything else. You ABSOLUTELY have to understand the soil conditions of your site.
Quick sidestep.
In college, my civil engineering degree’s “Area of Concentration” (as it was called, back-in-the-day…) was Soil Mechanics. I have always had a proclivity to gravitate to soils.
There is an inherent variability that soil mechanics impose on a construction project. The designers have to make engineering judgements based on what can reasonably be expected to be found under the crust of the earth. But, you never really know what you are dealing with until you put a shovel in the ground and start working with the conditions.
That inherent variability can be unnerving because of it’s unpredicabilty. But to me, it’s the shyt that gets me up and out of bed in the morning.
Every soil-related issue is a puzzle. It’s an equation with a dozen variables. Soils are meant to be touched & felt. They require you to use your senses beyond punching numbers into a calculator. It challenges both your intellect and your intuition.
You need to know what’s under the hood. Take the time to review them.
Think about something for a second: How many of your pay items will be installed in, under or adjacent to earth? At least 25%. Maybe 50%. Each of those items will be effected by the ground conditions. You have to anticipate the effect that this will have. You can’t see the soil yet, but it’s there. And you have to build in it. So get to know it as fast as possible.
Will the soils provide the bearing strength we need? Are we going to be dealing with stability issues? How will precipitation effect various pay items? What kinds of consolidation or compaction methods should we start thinking about?
Get to know the soils first.
And just a quick note, I’m purposely NOT going to get into soil boring review tips; I’m going to hit that in a future article. We’ll have plenty to talk about later….
2. Review the Existing Utilities
At this early stage of job preparations, you’ve developed a general idea of what utility systems you are going to be building: Sewer, water, sanitary, etc. The proposed utility plans are pretty easy to review: They are the nice, pretty BOLD lines on the drawings.
The ugly, dashed, often-times discontinuous and obscure lines on the prints are the existing utilities. And just like the soil borings, understanding the existing utility systems is of critical importance to building a job.
Let me get on my soapbox for a few quick paragraphs:
How well you mitigate existing utility issues will play a key role in whether your project will be completed on-time.
Utility coordination issues are the death nell of construction projects. If you don’t get your arms around coordination issues, your project will suffer.
Here’s a fact: No matter where you are, no matter what you are building, every project, even a project in the middle of a cornfield, has utility issues to manage. It’s that simple. Get used to dealing with them.
And just like soil conditions, navigating & coordinating underground utilities requires that you deal with things that, for the most part, you can’t see.
You HAVE TO have a strong handle on the utility systems on your project site. I can’t be more blunt than that.
Here are a few ways I like to review the existing utilities:
A. Know Who You Are Dealing With
First thing’s first – Identify the utilities in your project area. Usually the affected utility companies are listed somewhere in the plans or specifications. Get a handle on the 3 or 4 or 12 carriers you will be working with.
Often times, the specifications will list the utility companies and the timetables for any planned relocations, as well as contact information for their coordinator.
B. Trace EVERY Line
Experienced field engineers who read this are going to smile when they read this: You will be surprised at how many existing utility drawings don’t have contiguous line work shown on the drawings….
I kid you not. It happens ALL the time. Don’t ask me why. It just does.
As you are looking at the utilities, make sure they are contiguous. Look for laterals. Watch for lines that are not contiguous, that just sometimes stop, or disappear between pages. Watch out for missing laterals. Or for lines that have the symbol chopped off.
C. Make Yourself a Highlighted Utility Atlas
So to take Item 2 to the next step, build yourself a highlighted map. It will be an important Go-To reference through the entire lifespan of the job.
Color-code each carrier. Trace out each line & lateral.
And check it out: Look at the red “question marks” on this colored atlas. The lines just vanish! “Item B” (above) in action….
Since it is common for us to be using 11×17 sized sets of prints, build yourself an end-to-end strip map of your site. Tape the sheets together. Now you can see the job from end-to-end in a single exhibit.
I have always made strip maps.
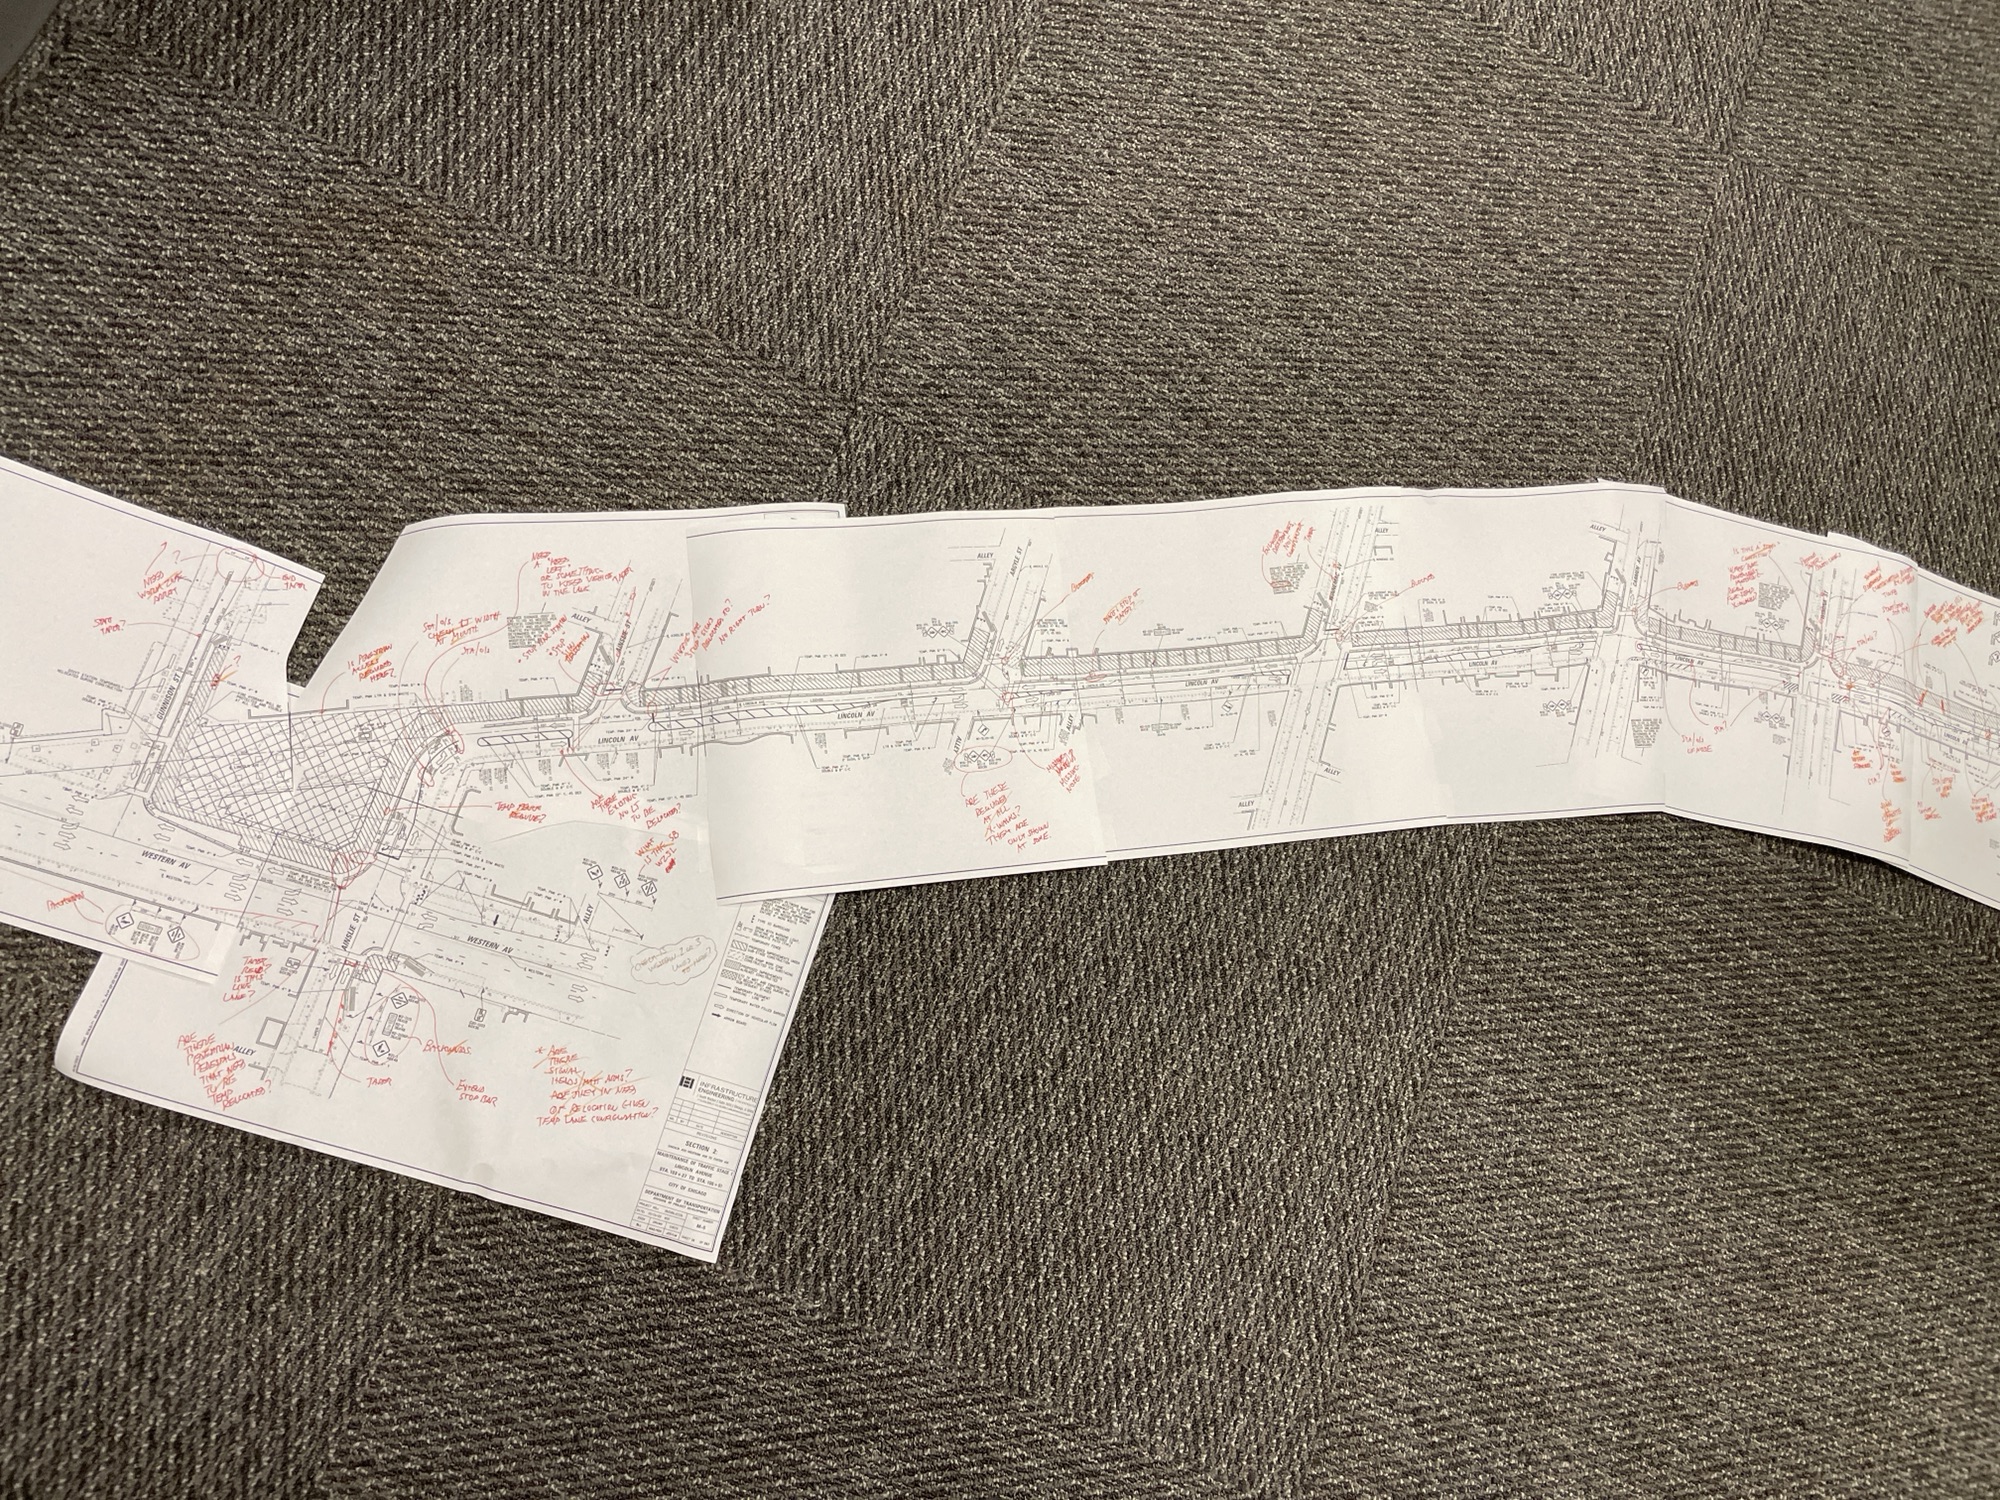
Strip maps are great for utility coordination meetings. Utility carriers typically are only concerned about themselves. They make money when product can be carried through THEIR lines. They don’t care about any of the other carriers. Maps give context to the who’s & where’s which you need for coordination.
And now that you have your battle map – Stare at it. Trace the lines. See where things are at. Look for trouble areas. Start asking yourself, “What is going to be in our way.” Be the commander. See & understand your battlefield.
D. Review the Utility Relocation Permit Drawings
If you are working for a government agency, likely, a lot of legwork has probably been done by the designer and the agency in getting conflicting utilities relocated. Likely, there will be permit drawings from the carriers. You should have copies of them in the field office.
As you conduct utility coordination meetings, you will hear more about the relocations. You will hear about their proposed locations. You will need to think about their construction methods (open cut, directionally bored, etc) and how their methods dove-tail with parameters on the site (both existing as well as proposed).
Don’t let the permit drawings die in the files. Use them. Understand them. Build them in your head NOW rather than later.
E. Dive Into the Proposed Utilities
Only after you have full knowledge of the existing utilities and the relocation plans for some/all of them are you ready to start looking at the proposed plans
Start looking for conflicts. Make sure that everything fits together in 3 dimensions. Start building things in your head. Think of spatial relationships. What is the sequence of construction? Who will be building over / under / adjacent to whom?
Sewer. Water. Electrical – DON’T FORGET ABOUT THE ELECTRICAL!! A lot of times, field engineers take the electrical underground for granted. “Oh, don’t worry about the electrical conduit can go anywhere.” Don’t say it! Treat the electrical runs just like you would the big utility pipes. Everything needs to co-exist. You might have multiple runs of roadway lighting, pedestrian lighting AND communication systems to deal with. They all need a trench. Don’t get lazy….
Think about site logistics. Who is relocating first? What needs to be relocated to allow your construction contractor to proceed with his work? Can the two entities coexist? Is it better for the utility company to relocate first? Can construction staging elements be shared?
Take a look at your utility tie-in locations. Are the electrical services where the Designers expected them to be? Will the traffic signal power & phone services be nearby?
Again, think about construction methods. Is the gas company installing their pipe open cut or are they directionally boring their new pipe? How will their installation be assimilated into the new construction?
And here’s a tip: Have the utilities install standpipes at regular intervals above their new pipe. What’s a standpipe?
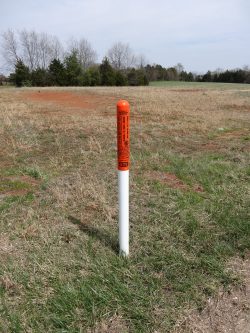
A standpipe is simply a 2″ or so PVC pipe that is placed on top of the utility pipe. The crews will backfill their trench leaving a physical marker identifying the line’s location. It also give you the ability to drop a tape measure down to validate the depth that the line was installed at.
Cooperative utility carriers will likely do this for you if you ask them prior to the work starting. These markers are invaluable to contractors working around their new lines.
3. Build Your Paving Maps
In the same fashion as you built your utility strip maps, do the same for your paving plans.
Highlight / identify the different types of pavements you are constructing. Post the maps on your walls.
Now just like you did with your utility strip maps, take some time and just Stare at Them. Build them in your head. Think about traffic staging. Think about construction methods. Is there enough room for the paving train? Will the concrete pavement pours be hand-framed or will they be slipformed? How will the intersections be jointed? How does the traffic staging effect production levels.
Review the project requirements for thickness checks. Look into the thickness coring requirements. Look into the specifications for bump testing or profilograph requirements. Read & understand any performance-based testing requirements that need to be implemented. Start planning your strategies for dealing with these issues now. What resources do you need to execute these tests? What is the frequency for testing? Is our crew responsible for laying out the core locations?
The time to prepare for pavement testing isn’t the day before the pave, it’s before the pavers even show up to the job. Get yourself prepared ahead of time. Have a plan in place.
4. Review your Job Categories
I was tempted to develop an expansive list of review categories to use as a base for a plan review. But, as I started diving into it, I discovered that trying to build a detailed list might be a futile effort. Each project is truly its own snowflake, with its own elements and requirements. I thought that trying to build an all-encompassing list wouldn’t be a worthwhile endeavor.
An easy baseline to start from might be something like this:
- Demolition & Removals
- Traffic & Staging
- Earthwork
- Utilities
- Structures
- Paving
- Electrical
- Specifications
- Submittals
- Construction Details
- Contract Administration & Documentation
This base list probably encompasses 95% of the projects that a roadway Resident Engineer works on, so I think that this would provide a serviceable starting point. You could use this as the Level 1 of your project’s mind map or work breakdown structure and start building off of it. This is just a starting point to get you organized on the macro-level, you can expand on it as you need.
Dive into each discipline. Get into the details. Start thinking about overlaps. About gaps. About coordination between work elements. Start looking at the driveways & grade transitions. Where do I need temporary pavement? Will my temporary wood poles fit with the paving plan? Will the new embankment be able to be installed without temporary earth retention along the stage line?
The list of questions is limitless – So keep asking them. I covered a whole bunch of “Ticklers” in my first article in this series (CLICK HERE TO READ IT). Use your own “Refresh” button and go back & scan it before you start your review.
And this leads into my last point:
5. Ask Questions
Let’s get it out on the table – You’ve only been involved with this project for a few weeks. There are lots of people who have been involved for A LOT LONGER than that. Don’t be afraid to use them as a resources
You will have questions. Get them answered.
In an earlier post, I talked about Ego. Right now, at this early stage of the project, you can’t afford to let your ego get in your way. You might not be able to answer the questions you are developing. And that’s OK.
Learning to know when to ask a question is part of becoming a mature engineer.
We all want to be able to answer any question. And right now, you are feeling like the Big Man / Woman on Campus. You want to be able to thrust yourself confidently into the project and make decisions. That’s great, but, you need to do it tactfully. Responsibly. Professionally.
Here’s how I know when to ask a question: After I have exhausted all of the information that has been given to me, if I cannot answer the question, I’ll ask. You should do the same.
Dig through the plans. Dig hard. Look everywhere. Put sheets together. Look for a special provision. Check the general notes. Ask a co-worker. Exhaust the resources you have. If you’ve done all that & still come up short, then send the question up-the-line to the designers.
Ego stays in-check. You get an answer. You now have another piece of intelligence about the battlefield.
Next time, I’ll dive into the next piece of job set-up: Getting the administrative elements organized and ready for action.


Be the first to comment