
Construction engineering can sometimes be, well, OK, I’ll say it – It can get boring….
I know, you’re going to jump down my back and tell me I’m being hypocritical. “Oh c’mon, Bob, you always talk about how being on the construction side of engineering kicks ass. Now you’re telling us it’s boring?”
No, no, don’t get me wrong, hear me out. Like any job or career path, there are ups and downs, things we enjoy and things that suck. Engineering is no different. I’ve made a career in the trenches and have enjoyed it. Everything we do can have “….its days.” Days of pushing paper, running cost estimates, getting mired in the day-to-day grind.
One of the ways to break-out of the grind is to have a new situation dropped on you. A problem needing a solution. Something that you haven’t seen before, like a sick curve ball that makes you buckle at the knees – All you want to do is get back into the batter’s box to get another swing at it. You don’t want to be beaten, you want to beat it.
This past summer, one of the guys on our crew was on the proverbial pitcher’s mound dealing some nasty curve balls. The situation made for a great excursion into a subject matter that we’ve covered in some previous articles.
Let’s take another walk down Pile Driving Avenue. I want to introduce you to a new way of thinking about how you monitor pile driving. You might need to keep an air-sickness bag nearby – This one is gonna’ get a little geeky….
Standard Methods of Pile Driving Monitoring
In one of my previous articles, I wrote a post-mortem about a situation that we had revolving around our abutment piling for a railroad bridge project (CLICK HERE TO READ IT). In that article, I have a section called “Pile Driving 101.” If you need a quick refresher on pile driving basics, you might want to go back and check it out.
Pile driving is one of my favorite things to be involved with in construction. It’s a combination of soils and structures. There’s theory crossing over with actual construction. As soils can have an invariable quality to them, structures typically are very black & white. Blending these elements makes driving piles a constant challenge. And as engineers, let’s face it, we like challenges.
Driving piling, and the methods by which we, as field engineers, monitor the work, are pretty scripted & orderly. There are standard operating procedures for how, as a pile is driven, the engineer monitors the various observational criteria to determine the load carrying capacity of the finished pile. It’s tried & true. It’s been successfully done for decades.
I think that I can speak for most engineers who have learned & are experienced in driving piles that we’ve all probably been taught the same method:
–Gather all of the pile hammer’s relevant statistics (like the type of hammer, the ram weight, the “stroke” of the hammer, etc.)
–Derive the pile driving criteria that you’ll need in the field to determine the actual pile’s capacity
—Observe the actual pile being driven, counting the number of hammer blows it takes to drive the pile “X” inches (or feet)
—Observe the height that the hammer in order to determine how much energy is being delivered to the pile
–Use a table or other precalculations you’ve derived to determine the actual pile’s load carrying capacity at that given moment.
–Once your pile has the achieved the design bearing capacity, stop driving the pile.
If you haven’t been involved with pile driving, this probably sounds pretty un-nerving. But like any other skill, once you understand how to do it, it’s like riding a bike.
I combed YouTube and couldn’t find very many decent videos that explained what a pile hammer looks like in action, but this one isn’t too bad – Check it out:
https://www.youtube.com/watch?v=Bw_KFbFyHSI
What you are seeing in the video is the actual pile hammer hitting the pile, then jumping out of the pile hammer cylinder. The hammer “pops out” of the piston through a combination of rebound off the top of the pile as well as ignited diesel fuel in the cylinder exploding it upwards to then fall, by gravity, onto the pile, much like a piston in your car operates.
Through calculations, we can determine how much energy is being applied to the pile when the hammer falls and strikes it. And through other calculations, the fall height can be converted to a strength value, giving us an anticipated bearing capacity of the pile.
Simple, right?
As the inspector, you’ll be counting the blows of the hammer. You’ll also be watching the pile as it is being driven into the ground, watching & counting how many blows it takes for the pile to drive the pile a certain distance into the ground. The pile is marked in increments (like 1 foot, or 12 inches) so it’s easy to count. You also be looking up at the hammer to see how far the hammer is falling: That fall distance is never the same, it will always be varying to some degree.
So wait: I have to rub my stomach, pat my head & keep count of how many times I did both, right..???
Right. That’s basically the drill.
Yes, as the pile inspector, you have to have your head on a swivel. You will need to be counting blows, observing the tick marks on the pile in the hole, watching the hammer jumping out of the piston AND visually estimating the distance the hammer is popping-out of the piston. You’ll need to be keeping all of this information straight in your head. The pile crew will be looking to you to tell them when to stop the hammer.
Yes, there are a lot of moving parts. But once you get the hang of it, it becomes easy.
Now let’s be honest: Nobody sends a newly-minted construction engineer out to a pile driving crew, hands them a chart, pats them on the back and tells them “Good Luck” without training them. So don’t start getting all nervous just yet….
Full disclosure: No matter how experienced you are, you need to bring your A-Game to the piling operation. You need to be focused. You need to know what you’re doing. It takes driving a lot of piles to get comfortable with the operation. I’ll admit it – Even at start-up, for me, a guy who’s done a boat-load ton of piling in my career, the first few piles are always like your first at-bat’s of the baseball season. You need a couple swings to get loose and into the game….
Now, if you didn’t already notice, in the above-paragraphs I specifically underlined the “active” verbs as I was describing what needs to be monitored. And I did that for a reason. We’ll talk about why I did that in a few minutes.
The New Guy
Chad Peterson was an engineer who was part of our construction engineering crew this past summer. Chad has served as a Resident Engineer throughout the course of his career, so he was a great addition to our squad. He, like a lot of guys on our crew, have driven a lot of piles over the years. Once the contractors started gearing up for pile installation on one of the bridges that we worked on, we were definitely Good-to-Go having a guy like Chad overseeing the work.
But there was one hitch: Chad had his own way of inspecting piling.
Wait – Wha??
Yep. He did. And it took some cajoling from the rest of us to figure out what he was doing.
We’ve been doing our piling inspections THIS way for decades, now you’re saying you want to do it THAT way…? Skeptical – You bet!! You’re going to have to show us what this is. Wait, let me rephrase that: You’re gonna have to PROVE it to us that what you’re doing is correct.
And that he did.
Introducing – The “Chad Method” of Pile Driving Monitoring
As I underlined in the sections above, the “usual” way of monitoring pile driving is by counting hammer blows, watching the penetration depth of the pile, and watching the height that the hammer is falling.
What I have come to coin as “The Chad Method” injected a new skill to the mix: Listening.
This was the way Chad was taught when he was coming up through the ranks. He has passed this method onto engineers who he has worked with & trained in the method.
As you guys have come to know me through my writings, I’m ALWAYS up for a new challenge. Learning Chad’s method of inspection was immediately added to my Engineering Bucket List. I wanted to know what he was doing. And more importantly, I wanted to understand the theory behind what he was doing.
Spoiler Alert: It works. And the theory behind it works too. Let’s dive in.
What is a Saximeter?
When I first started researching the theory behind Chad’s method, I had to learn some new terminology. And it was terminology & technology that I didn’t know existed. I’m not even sure if Chad knew some of what I discovered.
Over the past couple of decades, engineers & scientists far smarter than I have been developing electronic measuring devices for monitoring pile driving criteria. I have personally been exposed to a monitoring devices called Pile Driving Analyzers. Strain gauges mounted on piles. Accelerometers. Impedance meters. Guys with Master’s Degrees & PHD’s come up with this stuff.
If you want me to explain how all this stuff works, you came to the wrong place: Sorry folks, too hair-brained for me, we just build things out here on the site! If you want to learn more, check out Pile Dynamic, Inc. website (CLICK HERE).
One of the monitoring devices that has been developed is called the Saximeter.

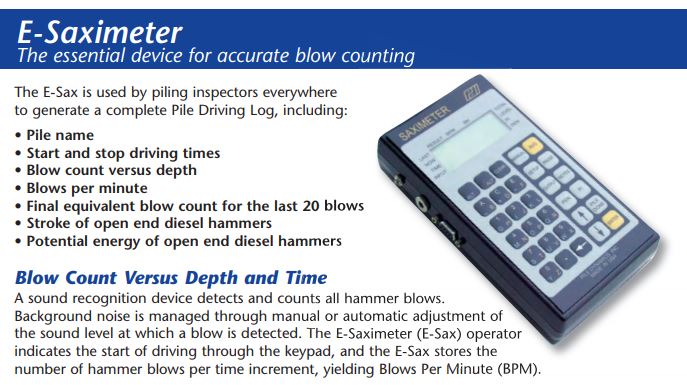
The device essentially uses sound to determine hammer energy being delivered to the pile. And not the energy in the sound waves or noise or vibration. The Saximeter monitors the time frequency between hammer blows and then correlates/calculates the energy being applied to the pile.
Pretty cool tech, if you asked me.
The premise lies in the height that the hammer falls, which is termed the hammer “stroke.” Using the time between hammer strikes, combining this time frequency with the physical properties & manufacturer’s operational range of the hammer, developers of the device determined that the “stroke” could be defined as:
h = (g / 8) x (60 / BPM)^2 – he
h = Ram Stroke (feet)
g = Gravitational Constant (32.17 ft/s^2)
BPM = Hammer Blows per Minute
he = Hammer Efficiency Loss Factor of approximately 0.30 ft
Solving this equation for BPM, we get:
BPM = 60 / SQRT ( h + 0.30 / 4.01)
So what does all this algebra get you? We have derived a formula that uses the hammer’s fall height to determine how many blows per minute the hammer will strike the pile.
If we know the weight of the hammer, how many times the hammer hits the pile to cause a certain penetration depth, we can determine how much energy is being delivered to the pile. And once we know the energy and the number of blows, we can calculate the pile’s bearing using the WSDOT formula prescribed by in the IDOT Standard Specifications:


This “secret sauce formula” now gives us the ability to use time between hammer strikes to determine what the hammer’s fall height is. Listening to the blows and recording the time between blows now eliminates the need for us to be looking up at the hammer to determine the fall height.
It’s pretty damned genius if you asked me.
How To Apply It to Inspecting Pile Driving
Let’s get back to Chad.
First off, to answer your question, No, Chad does not have a Saximeter. In fact, I can’t say that I know anyone who does.
So, that means Chad must have come up with his own “DIY Saximeter?”
Yup. Kinda, sorta…
Since the Saximeter uses the sound of the hammer impact to determine the frequency of blows, we already have that equipment: Our ears. We have the ability to determine the time between hammer blows. And we know that we will be able to visually monitor the pile penetration. So how do we develop the driving criteria that the Saximeter uses to determine the hammer energy?
Now, he’s going to get mad at me when he reads this, but I’m going to fully present this story as it happened to me.
So, we’re in the field office. Chad is in the process of explaining this “new-fangled” pile driving inspection method that he’s got to some of the guys on our crew. So, he rolls out this little spreadsheet that he derived for the hammer that was going to be used by the contractor to drive our HP 12×53’s to their 636 KIP required bearing. He starts explaining how the table is derived:
“OK, so this column takes the blows per minute, see, and then it translates it to blows, and then, OK, then, you have to back-calculate the fall height into 5-blow counts, but you don’t have to look at the hammer, you’re looking at your stopwatch, and then you take….”
My eyes started to glaze over. I could hear Charlie Brown’s teacher’s voice. I was lost.
Chad understood the method so well that it was intuitive to him how the system worked. He knew the methodology six ways to Sunday. And he was probably explaining it very well. But, it wasn’t getting through my skull. I had my way of inspecting piles, and what Chad was talking about was a radical shift. I couldn’t break my paradigm. That was my fault, not his.
I was used to counting blows. I was used to having to look up at the hammer and approximate the fall. Now, Chad is talking about counting blows and time and eliminating the need to look at the hammer. I had brain particles seeping out of my eyelids. I just couldn’t see it. My tried-and-true, “we’ve-always-done-it-this-way” method of thinking on how pile driving was administered was being flipped upside down.
I needed to get an understanding of how the numbers Chad was talking about are developed. So I charted my course to build Chad’s table.
I did it. And once I understood the numbers, everything made sense.
The Drive Criteria Table
In order for us to use the Saximeter Formula, we need to be able to know how much time there is between successive hammer blows. That is not an easy task. And for this exercise, we’re talking about 10ths of a second accuracy.
There’s no way I can start & stop a stopwatch with that level of accuracy.
The way that Chad navigated this issue was to use a stopwatch to determine what the time was for the hammer to strike the pile 5 times. Applying the Saximeter Formula and dividing the time by 5, you can determine the average time it takes for the hammer to cycle a blow to the pile. This is the time for 1 stroke to occur.
Once you know the stroke, you know the energy that is being applied to the pile.
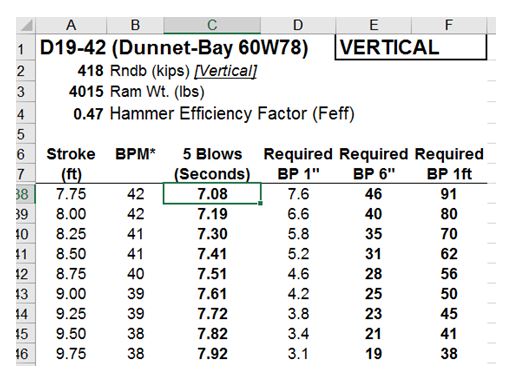
And once you apply the WSDOT formula using the energy and the blow count, you can determine how many blows are required for a specified penetration depth to know that you have achieved the required bearing.
 How to Apply It
So I went out to the field with Chad to run some side-by-side comparisons: The “Regular Way” vs. the “Chad Method.” It was great: Two engineers, geeks at heart, playing around with blow counts, tables & stopwatches.
The hardest part of Chad’s method is in learning how to count & run a stopwatch simultaneously. You are counting blows in your head, watching the pile penetrate each foot, recording the “blows per foot,” and at the same time, you are starting & stopping your stopwatch to get a time duration of a 5-blow series. It takes practice. It took me quite a while to get the hang of it. But, after about 5 piles, I got it.
Now, using the “Regular Method,” determining the hammer fall distance is a task of estimation because the hammer fall is always varying. When you first start driving a pile in soft material, the hammer may barely pop out of the cylinder. As your pile drives deeper and the soil resistance increases, the hammer fall will begin to increase given the need for more energy needing to be delivered to the pile. (Stiffer layers and frictional resistance between the soil & the pile will cause the hammer to jump out of the piston while softer soils or driving conditions will not cause the hammer to bounce as much). When you are below the hammer watching the depth gauge marks on the pile, your visibility angle looking straight up at the pile means you have to make a good approximation of how high the hammer is falling.
The beauty of the “Chad Method” is that you no longer need to look up at the hammer: Your 5-blow count time allows you to know the stroke. Once you know the stroke, all you need to do is check your required Blows per ___ (I built my table for 1 inch, 6 inches & 1 foot) and see if you’ve got your count. Since you now know what your penetration rate needs to be, you can easily look at your crib sheet and determine if you have reached the desired capacity.
I think that this method is a much more precise means of determining your hammer fall, and ultimately, the energy that is being delivered to the pile.
Chad noted that the method is also great for high-resistance piles. A lot of times, when you are reaching capacity, you or you are running out of drivable pile (ie. your driving conditions are softer than expected and your pile is driving deeper), you might want to start looking at “blows per inch” rather than blows per foot. Using the Chad Method, you can get a 5 blow count, have a very accurate stroke determination, then watch the pile on an inch-by-inch basis.
There’s an App for That….
One of the interesting things I found when doing my research on the Saximeter formula was found on my phone: When I Googled “Saximeter,” I was given a link to the App Store.
What??!! Yep. It’s true.
Somebody in App-Land actually has created an app that works like a Saximeter, using the microphone on your phone to count the blow frequency – Genius.
From what I gather, the app has much of the calculation methods used by a Saximeter.
The app costs $21.99 https://itunes.apple.com/us/app/pile-driving/id847675665?mt=8
I don’t get a dime for writing these articles. And I have a stopwatch. So for now, I’ll MacGuyver it. But, once I find myself on a piling project, maybe I’ll drop a few shekels, buy the app, give a trial run and report back to you guys on my findings.
If you decide to try the app, please let me know how it works for you.
After Actions Report
This whole experience of learning a new skill is the kind of thing that gets me up in the morning. It makes me look forward to getting to work. Expanding the knowledge-base & developing new skill sets, to me, is a blast. Even if I don’t apply that skill directly, to know that I have another tool in my toolbox makes the effort of learning exciting.
You may never actually try to apply this methodology. That’s OK. Understanding the theory behind a tried-and-true method of knowledge application will expand your knowledge base. That’s a win in my book.
And to my compatriot Chad: Thanks, Brother! You’ve proved that us Old Dogs can always be taught new tricks – I’m glad you taught this Dog a new one, and I’m glad I was able to share it with the crew here at the website. The credit is all yours for rolling the method out and teaching me how to apply it. Like I told you; I don’t know if I’d ever be comfortable enough to apply it on my own (since tried-and-true always works…), but it’s great to have another saw blade in the toolbox in case the tasks ever call for it. Cheers, Brother!!!

Thank You Bob, I hereby confirm the interactions between myself, Bob and his crew described in this blog post. It is well written and accurate.
I, like Bob, love to share knowledge and in particular knowledge on stuff that isn’t necessarily easy to understand. I can confirm there are at least a dozen pile driving field inspectors in Chicagoland who have used this method and become very comfortable using it.
Bravo Bob and Chad! Shared with all my staff. Bob’s website is the first page on our Construction Inspection OneNotebook.