
In my previous article (CLICK HERE to read it), I described the maturation of a piling bearing capacity issue that we had on a recent railroad bridge project. Let’s dive into getting the issues resolved.
The Next Phase – Get the Problem Fixed
So now, the fun part starts. Yes, I said Fun. There is nothing better, when you’re an engineer, of having someone give you a problem to solve. It’s why we chose this career path. It’s what we are trained to do. It’s what gets us out of bed every morning. We solve problems. And when I have a clean sheet of paper and a pencil in front of me, devising a solution that effectively solves a problem is akin to a fire fighter putting out a fire: It’s simply what we do.
I spent some time trying to develop different attack strategies. Whether or not any of my ideas would be useful was beside the point: Being a Resident Engineer means you are on-the-point. Leadership up the chain of command doesn’t have the ground-level view that the field staff does. To be an effective trouble-shooter means taking the time to look & understand as many of the parameters that a circumstance throws at you, and then assess how many of issues can be mitigated quickly & efficiently.
We knew that we’d need to increase the strength of both the north & south abutments. Should it be additional piles? Should we be thinking about splicing additional pile length onto the ones we already drove and take them deeper to a higher bearing? Maybe we could look at driving a new row of piles on either side of the piles that are in the ground already? What will the designers be able to accommodate insofar as how the abutment will react to new piles? What about the rebar that’s already been installed? Will we have to contend with the existing fiber optic line that’s just out-front of the north abutment?
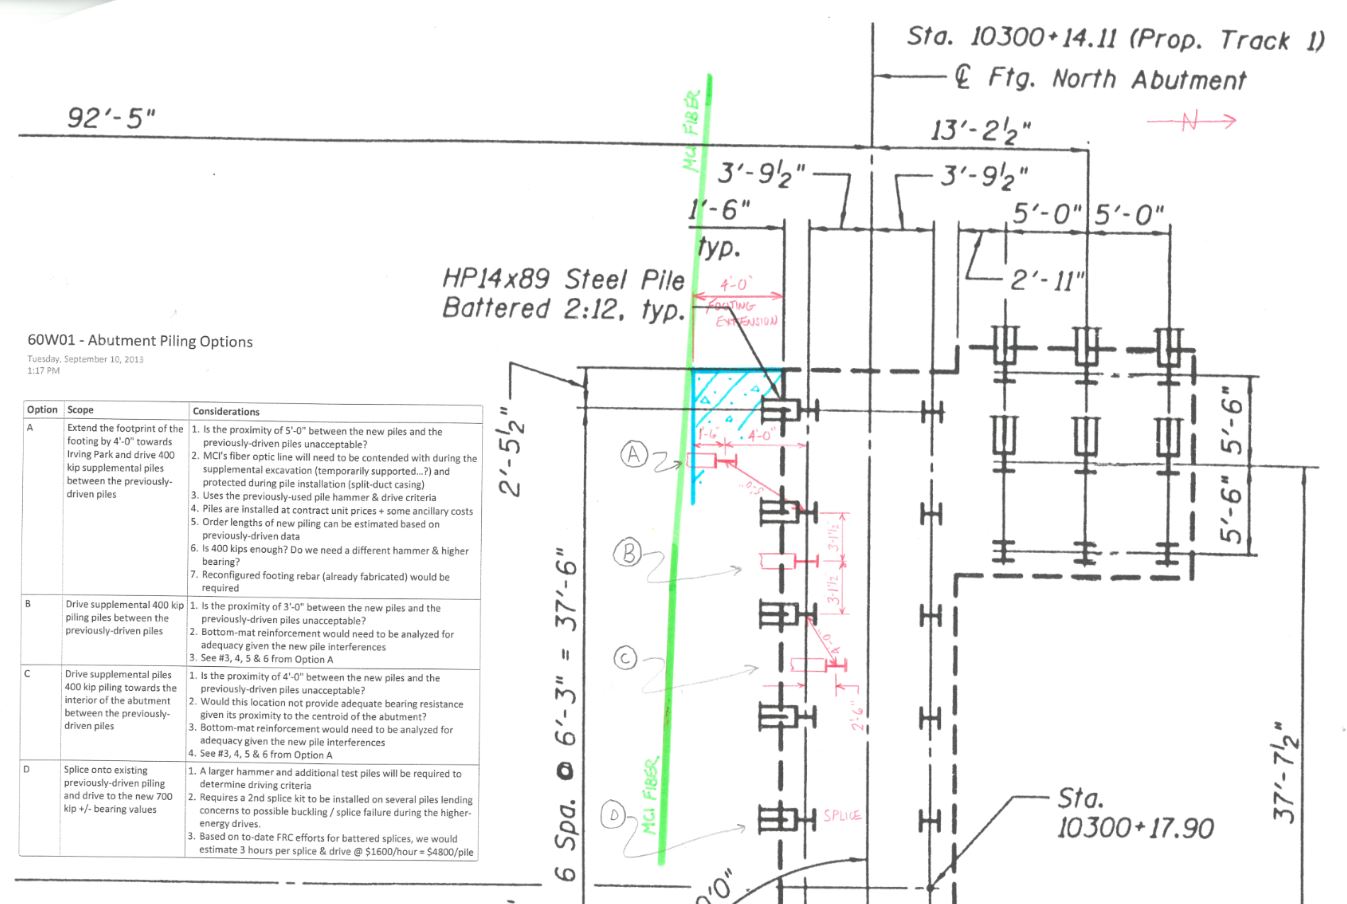
Ahhhh – The sweet smell of developing solutions. This was my work-up sheet:
And while we were devising potential solutions, the designers were too. Somehow, we’d collectively figure out how best to solve it.
There were two ideas that floated to the surface as the most-viable options: Either we drive new piles between the piles we’d already driven, or, we splice onto the piles that were already in the ground and work to drive them deeper to higher bearing values.
Both solutions seemed doable, and there were pros & cons between both.
Those of us in the field thought that driving new additional piles gave us control over the where’s & how many’s. We had a good feel for the local ground conditions. The piles were driving consistently. We had room to install them. Piles were available & ready to ship if we needed them. It seemed like a viable solution.
The designers, on the other hand, had their own ideas.
Geek Time – Piling Dynamics
When a pile is driven, there is a lot of vibration that occurs in the soil around it. During this vibration, the water in the surrounding soils is displaced in a phenomenon known as “liquefaction.” This process provides a small amount of frictional relief around the surface of the pile, slightly reducing frictional resistance and allow the pile to be driven with slightly less energy than would be needed if the pile was, say, “pushed” into place without vibration. Over time, days & weeks after the pile is driven, the pore water pressure that was generated during the vibration returns to its previous condition. As the soil returns to its existing state, the frictional force that it applies to the pile increases to a higher level than when the pile was first installed. This increase in resistance / bearing capacity is known as “pile setup.”
IDOT provides some empirical data regarding how much additional bearing capacity could be expected as pile setup occurs:
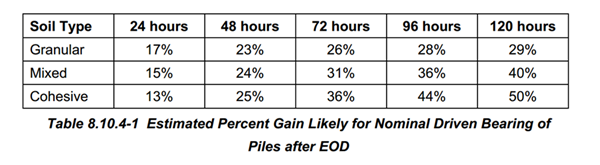
The Designers had recommended that we have the Contractor go through the process of trying to determine the actual bearing capacity given that pile setup had occurred. The piles would, no doubt, have gained capacity, it would just be a matter of how much. They had hoped that the increases in bearing might lessen, or even negate the need to drive more piles.
The process, known by some as a “tap test,” requires the Contractor to re-mount the pile hammer on the previously-driven pile, striking it a few times and recording the hammer energy & pile displacement, essentially back-calculating these observations to develop an as-built bearing capacity.
Sounds great on paper. But I’ll be the first to say it: Those of us in the field who would be responsible for executing these tasks didn’t have a warm-and-fuzzy feeling about the mission.
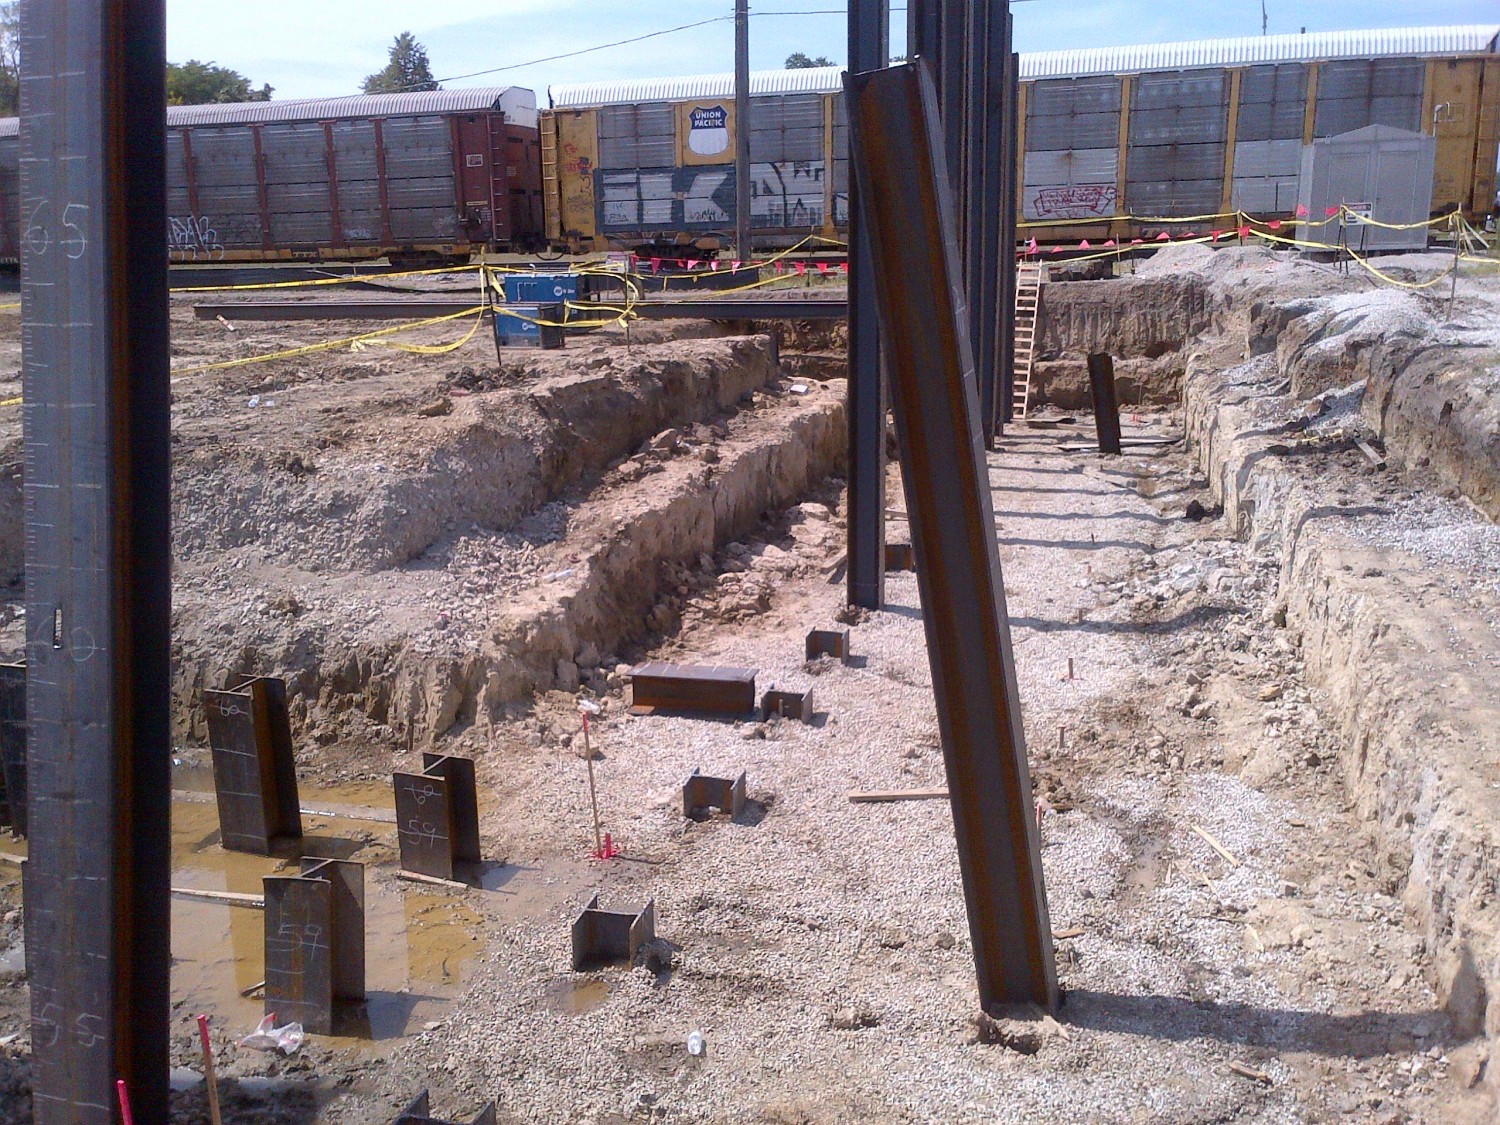
We talked to the piling subcontractor who validated our concerns: Many of the piles were battered, not vertical. All of the north abutment piles, verticals & batters, had already been cut off, leaving only a foot or so of exposed pile top to work with; this would mean that there wasn’t enough pile tail sticking out of the ground to confidently reset the pile hammer properly.
OK, so go ahead and ask me: Hey Bob, why’s that a problem?
Pile Driving 101
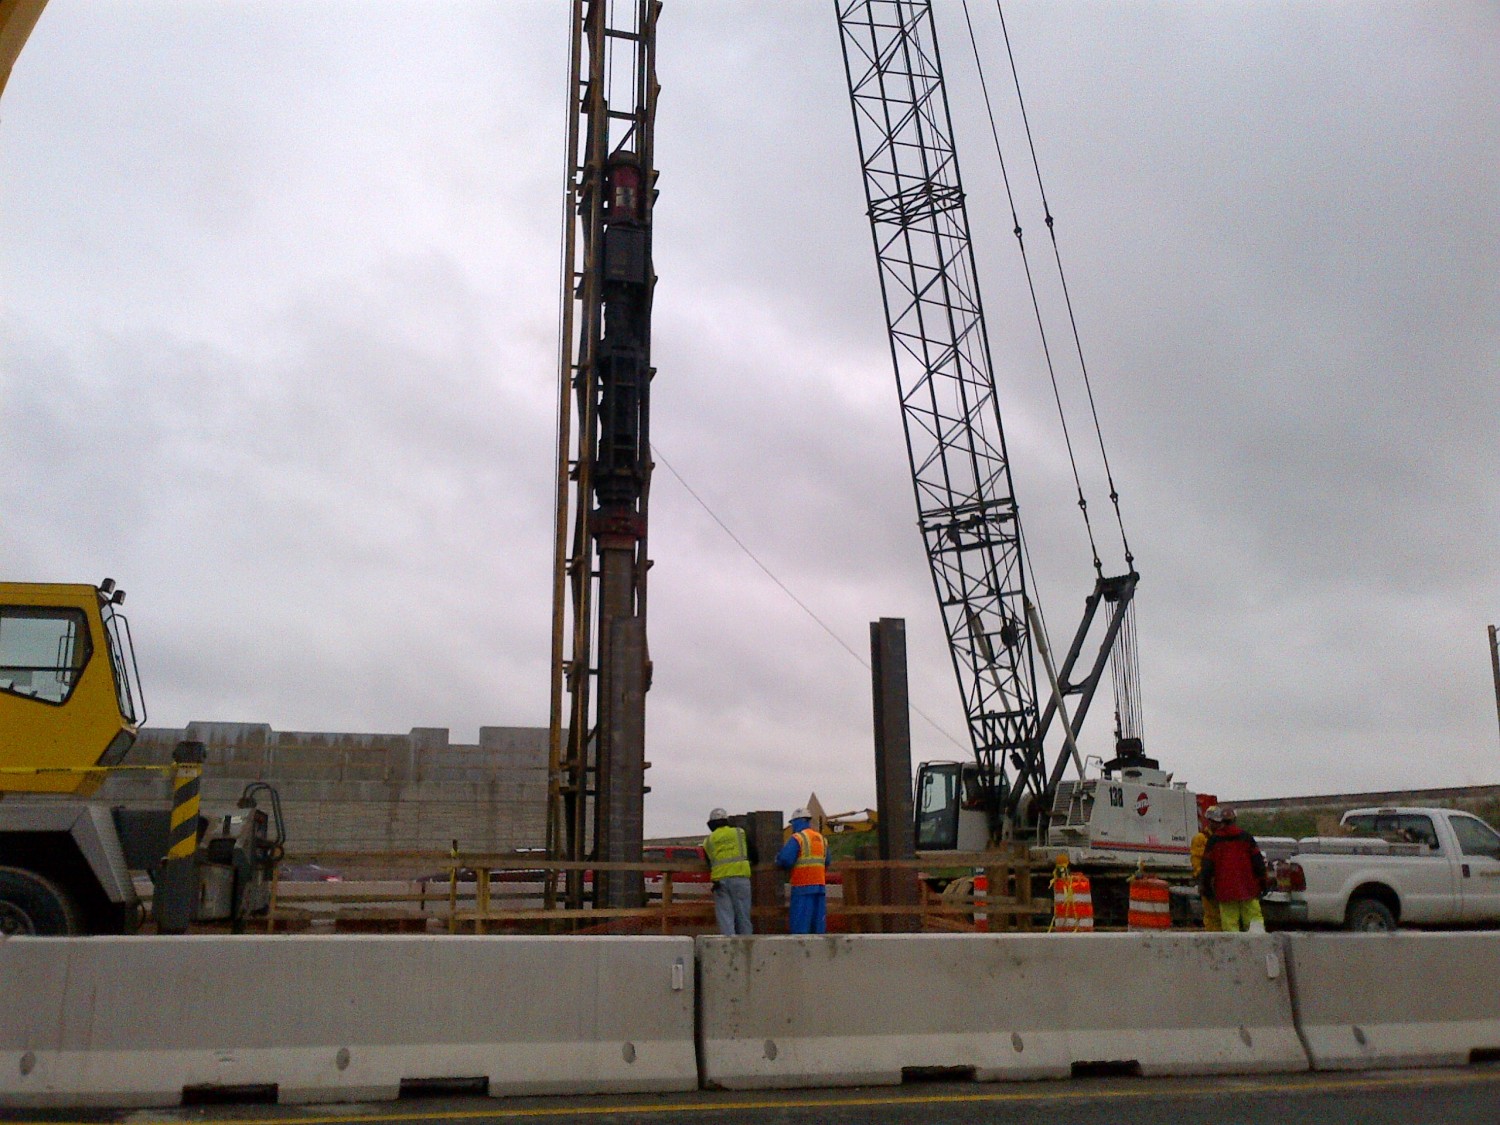
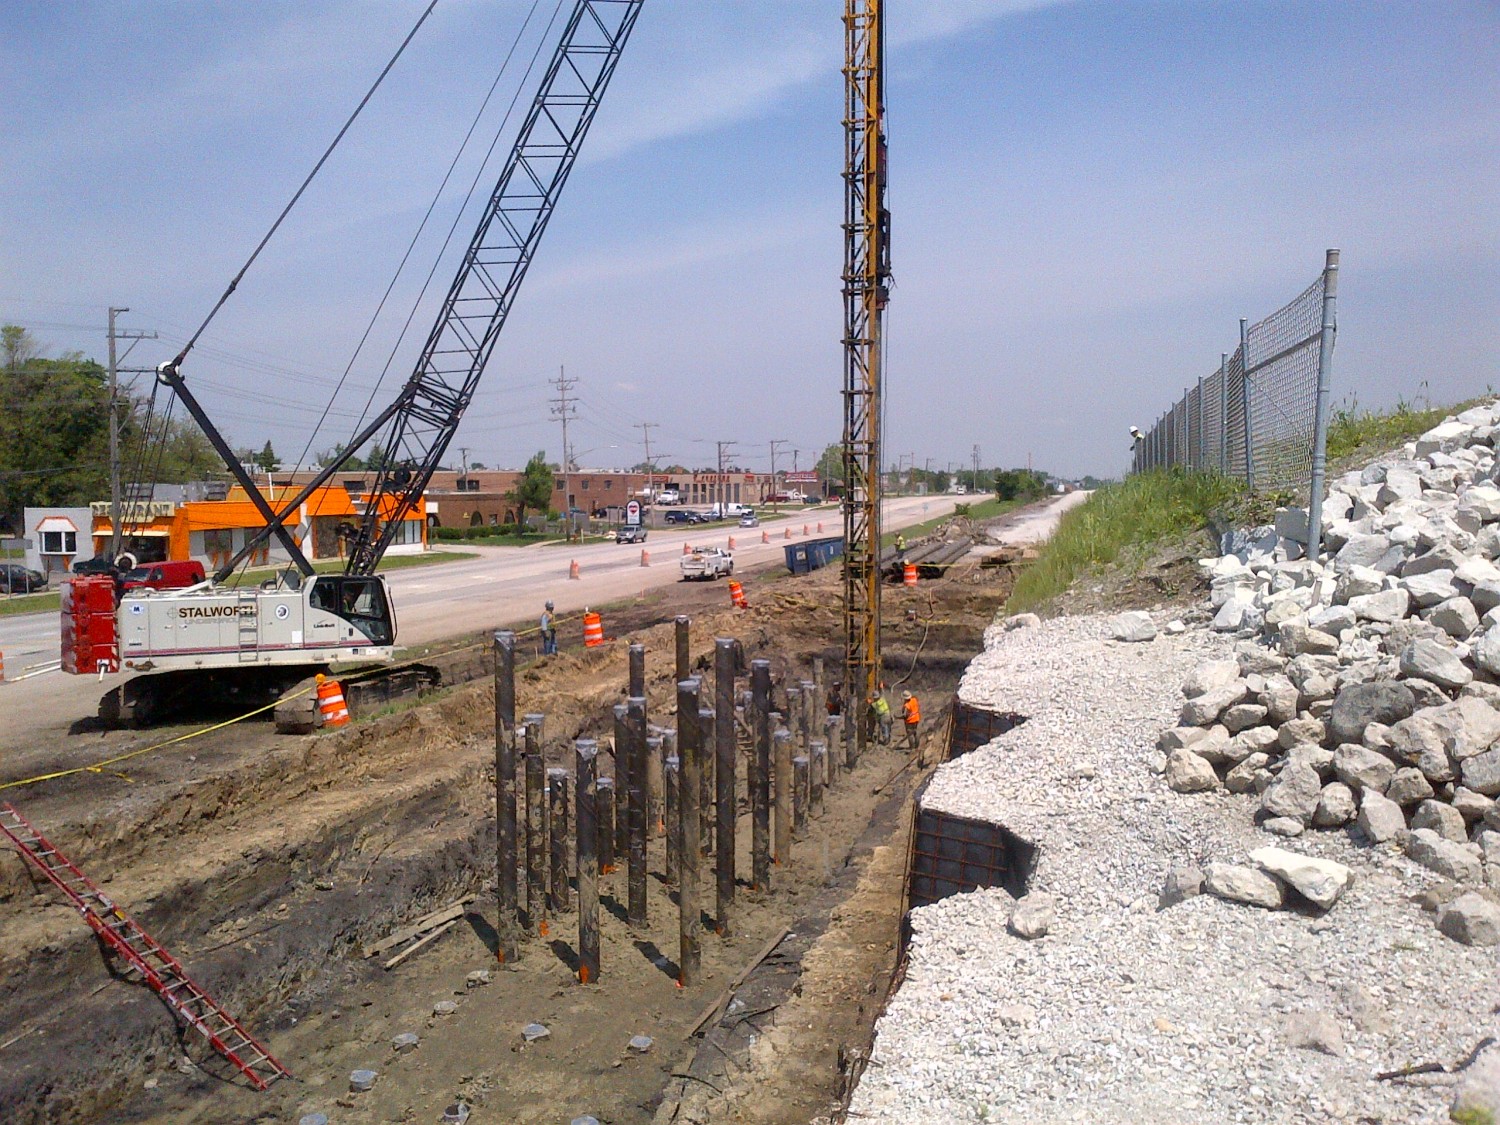
Let’s take a look (for you novices out there…) of what a pile driving setup looks like:
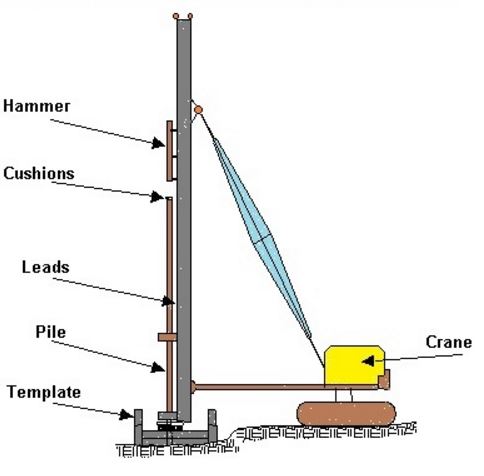
(Drawing Courtesy of: http://www.aboutcivil.org/pile-driving-equipment-hammers.html)
The pile leads are basically a long 3-sided structural frame that holds & guides the pile hammer and the pile. As the hammer strikes the pile, it slides down the leads. Carpenters, working at the bottom of the leads, do the grunt work in getting the leads set into the correct position, both horizontally as well as vertically aligned, as well as engage the top of the pile with the hammer. Setting up a vertical pile is slightly easier than a battered pile, simply because getting the layback angle setup takes a little extra effort for the carpenters & crane operator to secure.
In this picture, you can see the pile under the hammer, both of which are held in-place by the leads. Once everything is set, the hammer is energized and it does the rest.
The engineer monitors the number of hammer blows that it takes to drive the pile. Using calculations, given the energy that each hammer blow generates when it strikes the pile, the engineer can determine how much energy is being applied to the pile. As the driving progresses, the depth that each hammer blow drives the pile starts to decrease, and the hammer energy starts to increase: It is taking more energy to drive the pile into the ground, meaning the pile’s “bearing capacity” is increasing. Once the design capacity is reached, the hammer is shut off and the extra pile that wasn’t driven is cutoff.
Done. You’ve just driven a pile.
Pile Driving 201 – An Advanced-Level Class
So let’s go back to the designer’s proposal of resetting & restriking previously-driven piles. Is it doable? Absolutely. Is it difficult? For vertical piles, eh, maybe. How about for battered piles – Doable? Answer: Yes. Difficulty level – MUCH higher…
Here’s the challenge – When the carpenters align the leads to get ready to drive a pile, the pile is inside of the leads, and both are aligned as a unit. Once the extra pile that wasn’t driven is cutoff, there is no physical integration of the hammer & leads with the pile stub anymore. If you have to get back onto the pile stub to hit it again, there is very little ability to re-establish the leads/hammer at the actual driven angle of the pile. You can get it close, yes, but getting it perfect is not so simple.
The dynamic energy that is applied from the force of the hammer strike is tremendous. If the alignment is off, even slightly, the force development angle is off. Those forces will be dissipated somewhere. If the alignment isn’t right on, those vertical forces can turn into horizontal or bending forces in the pile….very undesirable.
This concern is exacerbated when we start looking at the need for splicing additional pile length onto the previously cut-off piles. Here’s a picture of an actual splice:
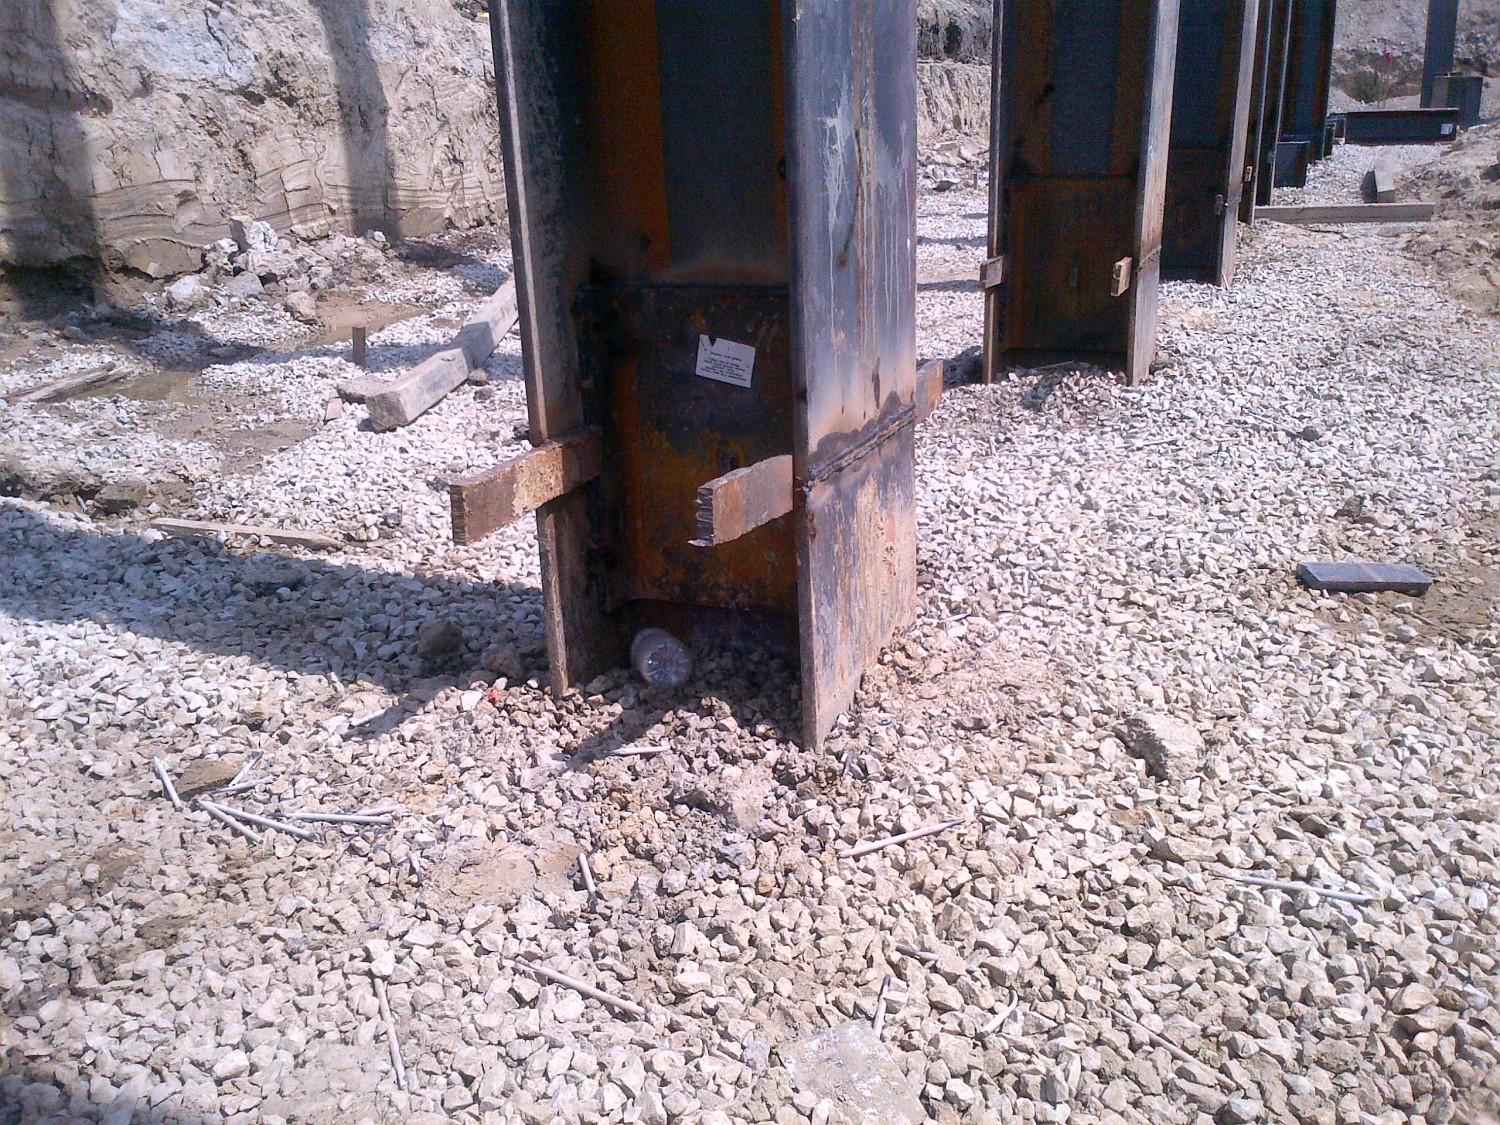
Splicing is used when a pile is driven and doesn’t achieve the required bearing capacity using the length of piling in the leads. Welders attach additional pile length onto the pile stub using full-penetration welds between the 2 pile sections. This is a common practice – A good welder can finish a splice in about 2 hours.
Typically, during pile driving, if we see that a pile isn’t gaining capacity and we’re anticipating the need for a splice, we’ll try to leave a couple of feet of pile sticking out of the ground so that aligning & welding the additional piling are easier for the welders to work on.
But if a pile only has 12″ or so sticking out of the ground (as was our case for the majority of our piles), it compounds the effort of getting the spliced section aligned with the stub. The shorter the stub, the more difficult alignment becomes. And when a pile is battered, it is extremely difficult to get the spliced pile perfectly aligned with the stub.
So now that you’ve got a handle on pile driving, let me ask you a question: If you had to re-fasten a board on your pool deck, would you rather try to fasten a new nail on top of an old nail and drive them together? Or would you rather just drive a new nail next to an old nail?
I think you get my drift…..
Finalizing Our Solution
So jumping back to our predicament, the designers had hoped that we would be able to get back onto the existing pile stubs, test a few of them, and then develop a solution to either splice onto the stubs, add additional piles, or possibly a combination of both.
As I mentioned, those of us in the trenches were against a solution that involved getting back on the pile stubs. It wasn’t that the proposal was impossible, it simply injected risk that we didn’t think we needed to incur. We knew we had a much higher degree of destiny control if we would just drive new, supplemental piles. We knew the hammer & it’s behavior with our soils. We knew we had physical room to get them installed. We wanted to keep the solution simple and predictable.
Given both options, our IDOT Construction Supervisor agreed that going with supplemental piles was the optimal solution. He, like us, did not like the idea of having to splice onto battered pile stubs. Solution ratified: We moved forward with adding extra piles to both abutments.
The north abutment footing rebar had to be removed to gain access to the bottom of the footing: We paid for that. We had to order 26 additional piles, 13 for each abutment: We paid for that. The Contractor’s equipment sat idle on the site while the solution was devised and the new piles were ordered: We paid for that down time too.
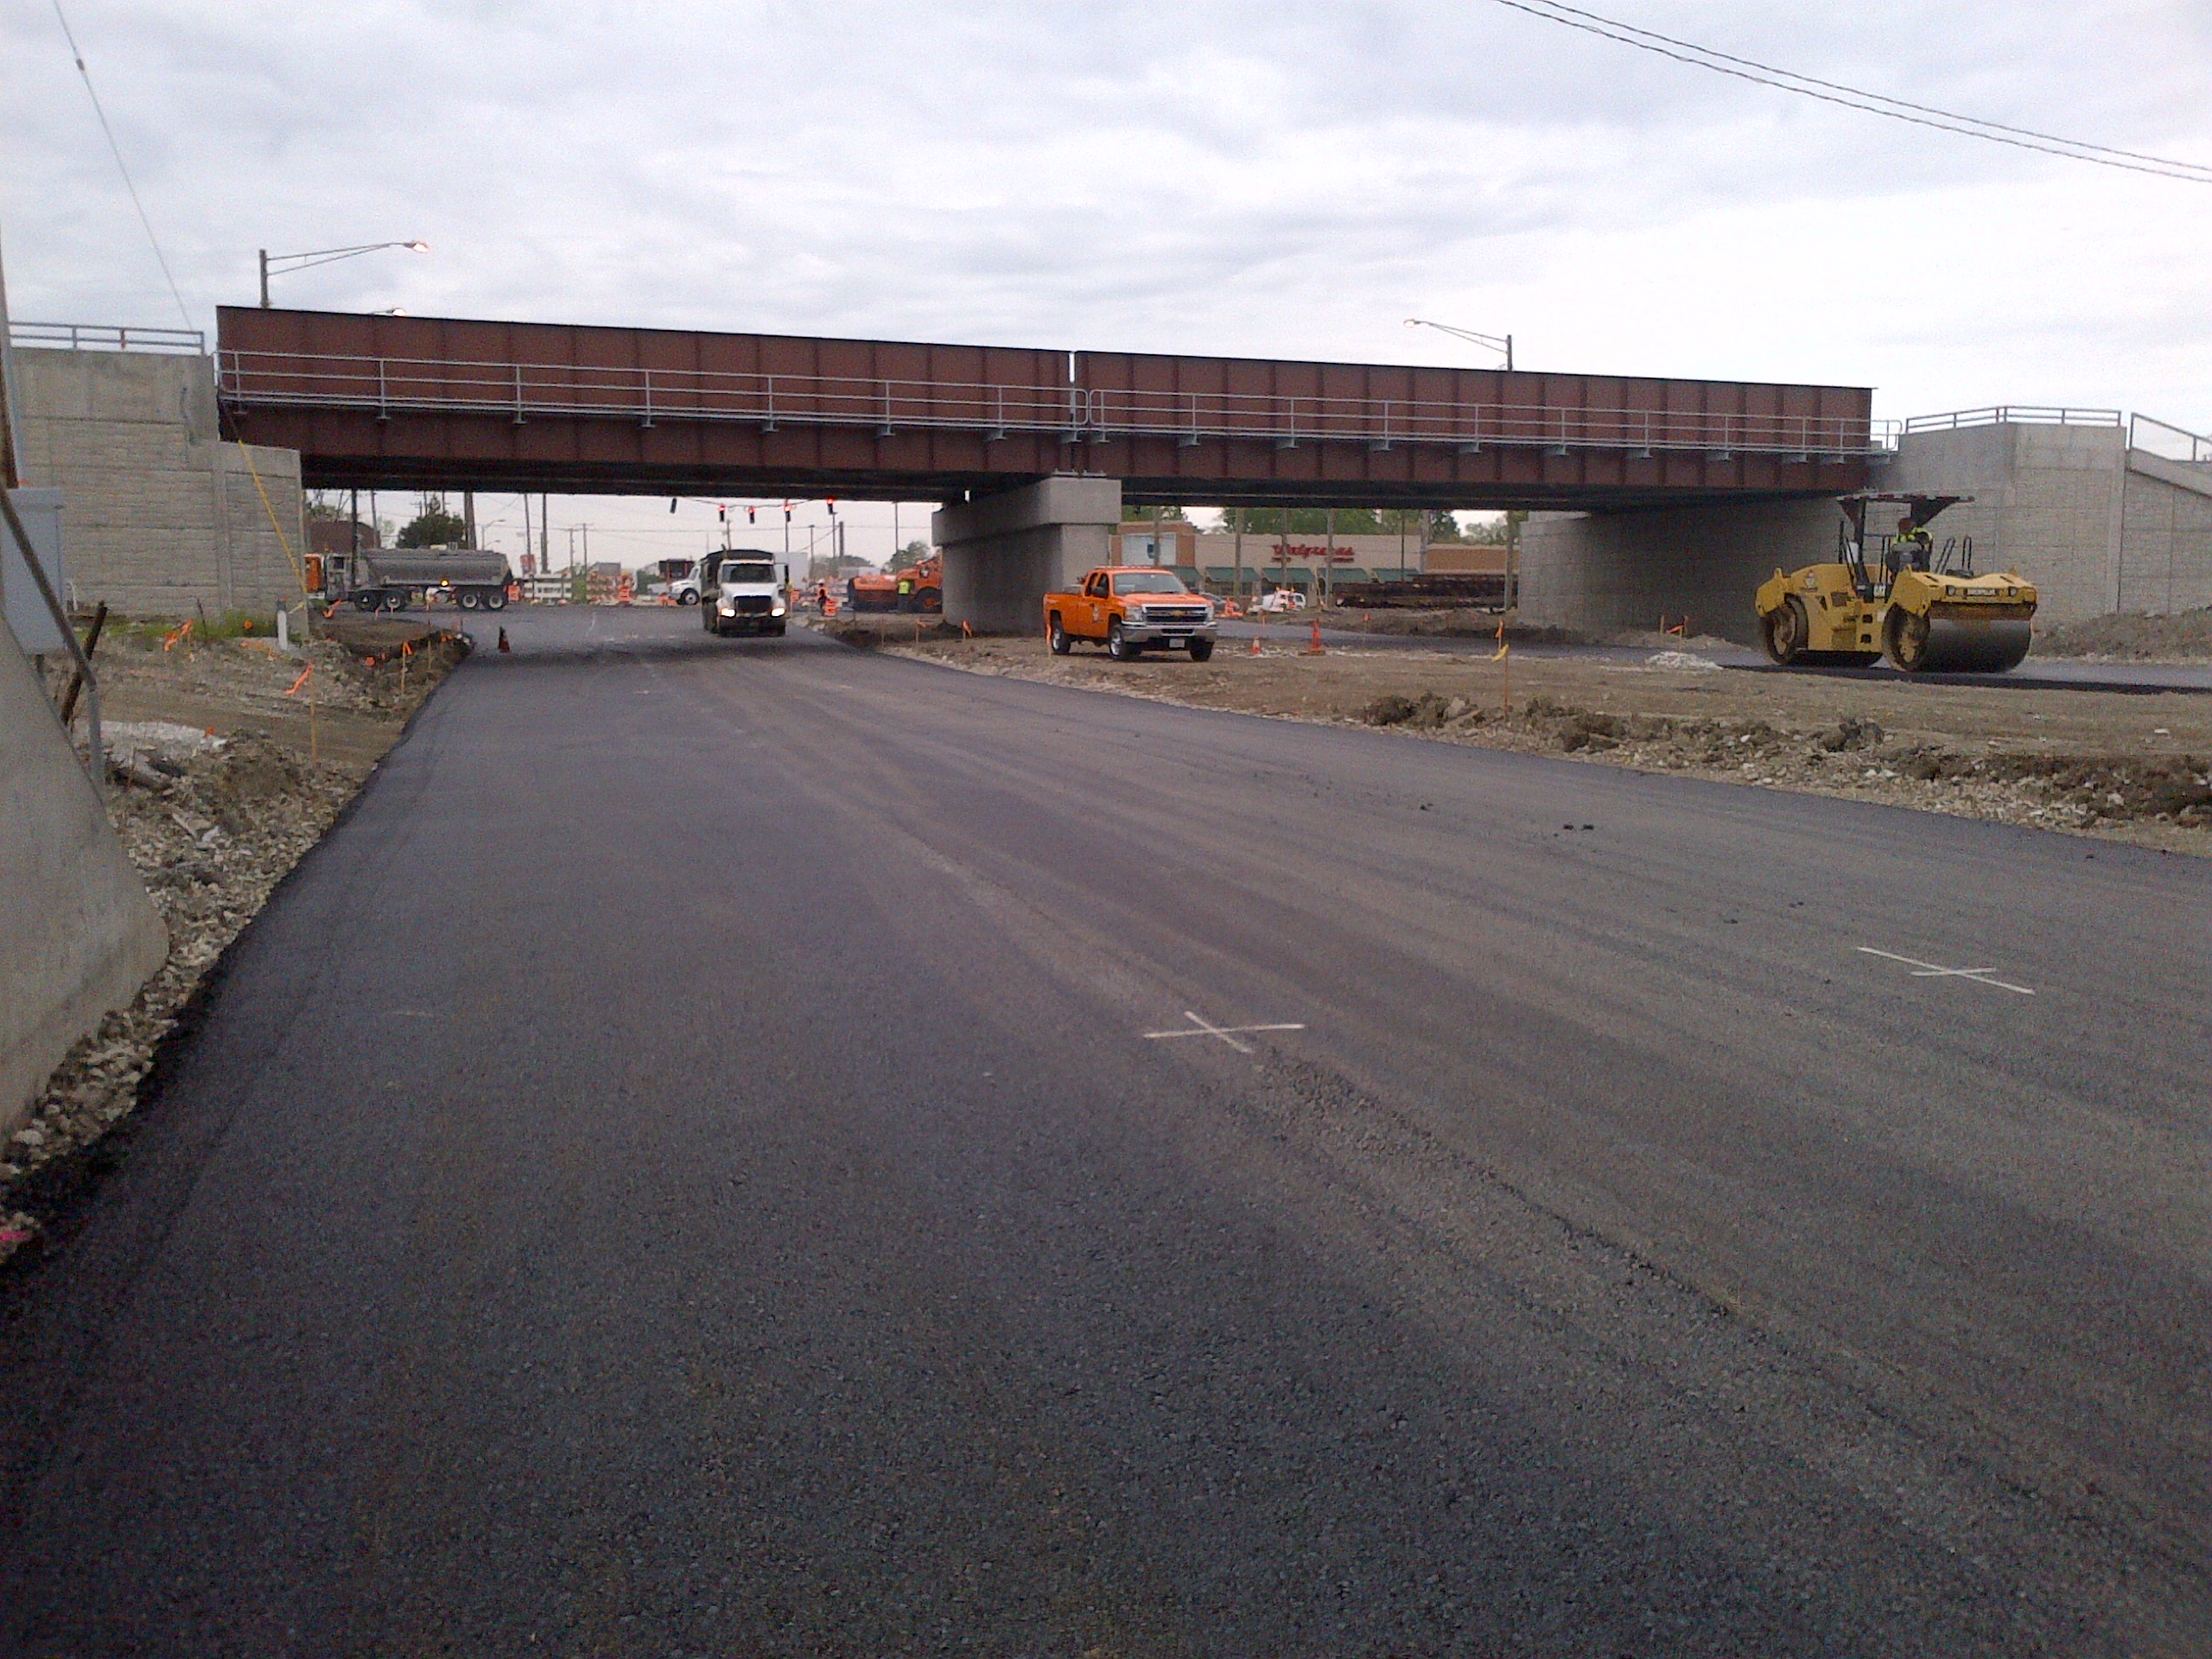
At the end of the day, the problem was solved. It cost some time & money, of course, but it was solved. Construction continued & eventually, a bridge was built. Mission accomplished.
After Actions Assessment
So take a deep breath and step away from the screen for just a second to catch our collective breath.
What an ordeal.
In my career, this situation is definitely one of the most dramatic story-lines that I’ve found myself being embroiled in. The emotional roller-coaster that the situation presented was not something that I’d want to have to go through again. One and done. I hope….
Any Lessons Learned? Cripes, how much time do you have….?
Let’s hit a few.
Checks & Balances Are a Necessity in Construction
As I wrote this article & subsequently relived this situation in my head, the flush of emotions of sitting in the field office with Dave & Dennis came back to me like it was yesterday.
When the designer told me that the piles were under capacity, I was downright freaked-out. My core was telling me that we did the right things, but I was letting the emotions of the situation steer me elsewhere. And that shouldn’t have happened: Why? Because I KNEW we ran our checks.
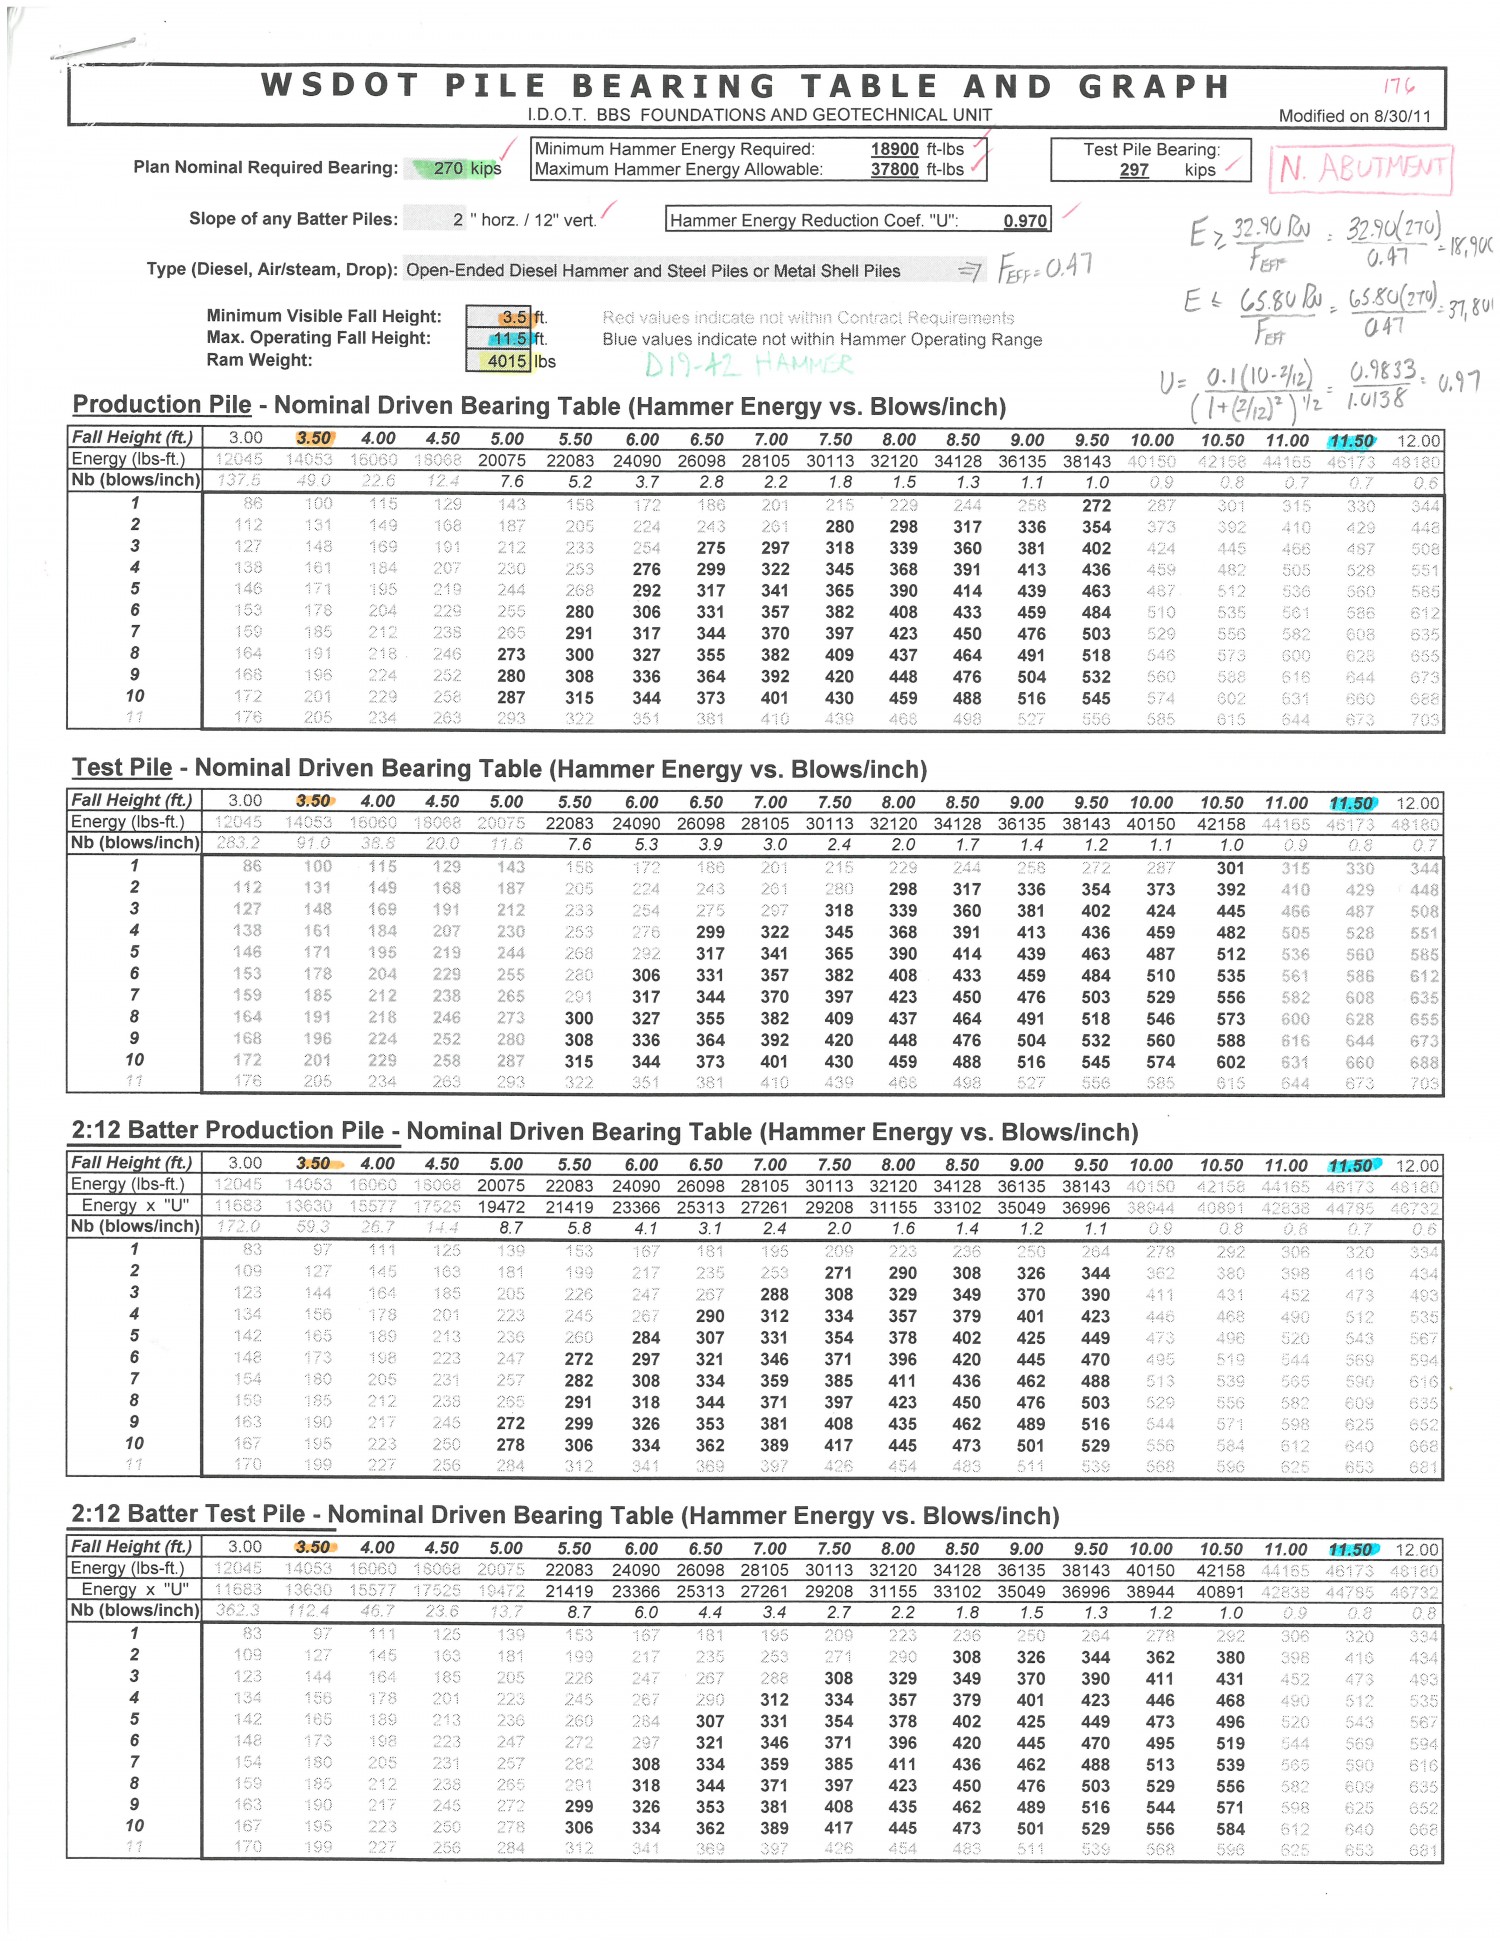
Even after I had hung up the phone with the designers, I KNEW that WE HAD DONE OUR JOB. Even though I let my angst for the situation get the better of me, I KNEW that we had checked our numbers before-hand. I KNEW that we double-checked ourselves internally. We KNEW we double-checked our drive numbers with the piling subcontractor before we started any pile driving. I KNEW that I ran my own long-handed calculations to check our driving tables (you can see my long-hand calc’s on the drive table, below). I KNEW we had read the plans and that we had incorporated the drive criteria as we understood it. We KNEW we really couldn’t have done anymore than we did.
The Phrase that Pays: Never Stop Checking.
When people don’t check is when things get jacked-up.
Checks and balances HAVE to be part of your Standard Operating Procedures.
In construction, you HAVE to make back-checking a routine activity. YOU are not the smartest person on the job. I know I’m not. The Contractor’s superintendent isn’t. Nor is the State RE. It’s when people get their collective heads together, when they do the preparation before going into an operation, when they research the details of what they are getting ready to build, when they run their own, independent calc’s to check what they’ve been given, that’s when the potential for problems is mitigated.
Everyone Needs a Pre-Game
When our daughter Chloe was born, my wife had to undergo a C-section: She had been in labor for hours, but Chloe got stuck on her way out. While I was on my way to scrub (so I could be in the room with Beth), I vividly remember passing by the nurse’s station in the hospital where Beth’s doctor was sitting behind a computer. I remember seeing the screen he was looking at: He had some sort of case study up and was reading intently. I vividly remember how taken-aback I was at seeing this. Her doctor, as far as I knew, was looking something up as he prepared to deliver our daughter. To this day, I still remember the mark it left on me: Here was my wife’s doctor, refreshing his knowledge-base, getting ready for a procedure. Smart people know how to prepare.
That memory has stayed with me to this day. If doctors make it their Standard Operating Procedure to check-down, then so should I.
So think, for a minute, like a football coach. Or like a quarterback.
You need your Pre-Game Prep. You need to watch game film. You need to know the other team’s tendencies. You need to know how to read a defense, to know the opponent, to know where our team’s gaps are. How can you lead a team to a victory if you haven’t prepared before kickoff?
You have to spend time doing drills. Like an athlete, gaining strength, developing motor patterns, increasing speed & agility doesn’t come from just putting on a pair of shoes and thinking about it. It comes from the grinding in the gym, on the practice field, in the batting cage.
Engineering is no different.
Just because you learned something years ago in a classroom doesn’t mean you are prepared to re-apply that knowledge in solving a problem today. You have to constantly drill your skills. NEVER STOP PRACTICING. YOU ARE ALWAYS LEARNING….
Always be training. Always be improving. Always spend time maintaining your skill set, increasing your knowledge base. Spend time playing out jobsite scenarios in your head. Before you head out to the field to cover your crew, have you gone through the installation in your mind? Have you done your homework on what you “opponent” (sic – Contractor) is planning on? Are you prepared? Did you run through the checklists? Do you have all the tools you need to make your work, and your crew’s work, successful today?
Don’t walk around the site like some kind of mindless, bumbling mouth-breather expecting everyone else to figure out what’s what. Get in the Game. Be ready to play.
Never Be Afraid to Ask a Question
The final take-away is the most-valuable one of the article.
When I look back at this situation, and I tell others about it, some of the first words out of my mouth are about how lucky we were. We dodged a bullet. Not just “me” or “we” but EVERYONE INVOLVED WITH THE PROJECT. And it was started with a seeming easy question: Were the piles in the wingwall OK to stay?
I’ll be honest: I’m NEVER afraid to ask questions. I enjoy refreshing the concepts in my head. I enjoy being the devil’s advocate in identifying & assessing issues. I like to look at issues from multiple sides. I love having multiple solutions to discuss with people on the job & to choose from. And I don’t mind if people, behind my back, think I’m a bone-head because I’m asking seemingly dumb questions.
Dumb questions aren’t dumb when the questions are asked with good intentions.
Initially, when I put the as-built sketch together for Dewey and the folks at the Bridge Office, I felt, well….OK, I’ll say it: I felt like I should know the answer to the question. I honestly felt like I was going to be bothering the Bridge Office with this. Sure, the piles were off position outside of spec tolerance, but it wasn’t a HUGE amount. Yes, we’d be able to easily shift the wall of the footing to encapsulate them. Do I really need to ask this question?
You know something: I’m not afraid of looking dumb.
I started this post talking about Ego. I tell everyone: My ego is very small. To be a successful engineer, it HAS TO BE. In fact, to be successful in life, you need to be able to shelve your ego. I was going to ask the question. Even though there might be RE’s out there who wouldn’t ask because their need to satisfy their egos, to appear to be the Big Man On Campus, to be the guy calling-the-shots, I’m just not that guy. Call me weak: That’s OK. I like having my suspenders tight and my belt tighter. I’m just not driven by ego…..
Think about this – Had the simple question not have been asked, what would have happened? When would the low capacity criteria have surfaced? Would it be after the bridge was built and trains were running on it. Would the bridge have settled? Would there be remedial work to correct it? Let your imagination run for a moment.
What if the piles were driven in the right spot? There wouldn’t have even been a question to ask. Now what?
Fortunately, none of that occurred.
Here’s the take-away: Ask questions. No matter how dumb you might think they are, NEVER BE AFRAID TO ASK. As I put in the headline of this article, as Jocko says, dealing with your own ego can be a challenge. Learn to keep it in-check.
My final advice to all of us: Walk into the field office every day and leave your ego outside. Ego is of no useful purpose in engineering or construction. Be a white belt. Learn every day. Love the grind of learning. Embrace it. Force yourself to be better & smarter on an incremental basis. Train. Drill. Practice. The results on the field will speak for themselves when you’ve put in the work. You will never eliminate mistakes. But if you stay true to your principles and are willing to ask questions, you will put yourself in the best position you can to avoid them.

I feel better about the pile driving method i use knowing you have dug deep checking it. Including mathematically and with field visits verifying its validity.
I recall describing the splicing procedure (if chosen) as requiring the carpenter to perform the welding work while standing on his head since only 1′ of pile was sticking out of the ground.
Great observations and recommendations about ego! It is always there. Beware of it in others but especially your own.
LOL. this brings back memories. I remember Mr. Wiater giving myself and Ryan a tour of the southside and pulling over to so Mike could “discuss” the solution with bridge office. I’m glad to say the hotter head prevailed… I mean Mike and they consented to additional piles. Splicing the battered piles would have been a nightmare.