
The majority of my working life has been spent on projects involving government agencies – The Illinois or the Chicago Departments of Transportation, various county highway divisions, O’Hare Airport, basically public works-focused clients. Each entity has its own proclivities, but for the most part, the battle rhythms are pretty similar.
Last year, I was platooned on a small site work improvement project for a private-side client.
Theme for this article:
Private clients have a much different knowledge-base than public sector clients
Construction clients, no matter whether they are public or private, have similar expectations: Deliver a high-quality construction project, control the costs, be proactive in communicating & coordinating the work.
When you are working with a government agency, the ebbs & flows of a project are Standard Operating Procedures. The people you are reporting to up the chain of command are familiar with the nuances of heavy construction.
But when you’re working with the general public, like your next door neighbor, or your grandparents, or maybe someone you met at church, they bring with them a varying degrees of experience with the construction process, and you have to find ways to deal with expectations. As a construction engineer, you must be adept at communicating technical ideas, work processes, logistical constraints and other industry-detailed elements into understandable concepts that a person-off-the-street can understand.
I wanted to share a story that drives home a couple of points that I think serve as great reminders for anyone who is working in a position of authority on a project where the customer might not be as knowledgeable as you are used to.
FIXING A RETAINING WALL
In my previous post on construction leadership & execution, I introduced a small condominium project that I was involved with in a Chicago west suburb. The project involved rehabilitating the parking lot & rear yard drainage system for a multi-story condominium complex. Our company provided the design documents for the improvements, and the Association wanted us to provide on-site construction administration during the build phase of the project. It’s not the kind of scale project that I’m used to working on, but, when your Commanding Officer deploys you to work on a campaign, you simply grab your gear and move out.
I had several folks from the condominium association who I interfaced with on a regular basis: They were all relatively “senior in their years” and all had a variety of life backgrounds & experience: Some understood construction from their personal work histories, some had been involved with their own personal home renovations, and even a few of the residents who I had met had engineering backgrounds.
One of the aspects of the improvement projects dealt with a 20+ year old timber retaining wall that was in a state of disrepair. Years of uncontrolled overland flow and a non-functioning underdrain system contributed to the wall overturning. Since the condo association had us working (and destroying….) their backyard area installing a new building downspout & storm sewer system, they thought it would be an excellent time to repair the overturning sections of the timber wall.
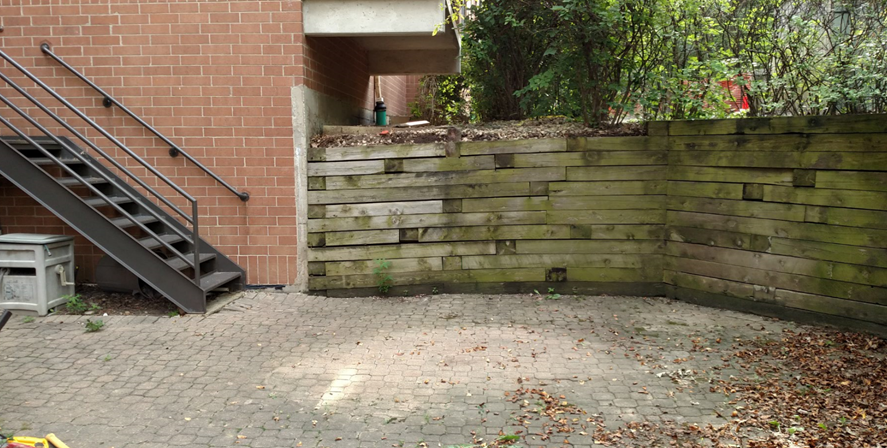
We received a reasonably-priced cost proposal from the Contractor to dismantle and re-erect a couple sections of the existing wall. We would be installing tie rods during the reinstallation to reinforce the re-erected timbers
When we started pulling apart the existing timbers, we found bad stuff. Although the front face of the timbers looked great, the non-functioning wall drains didn’t evacuate the water behind the wall, causing the backside of the timbers and the deadmen supporting the wall to rot.
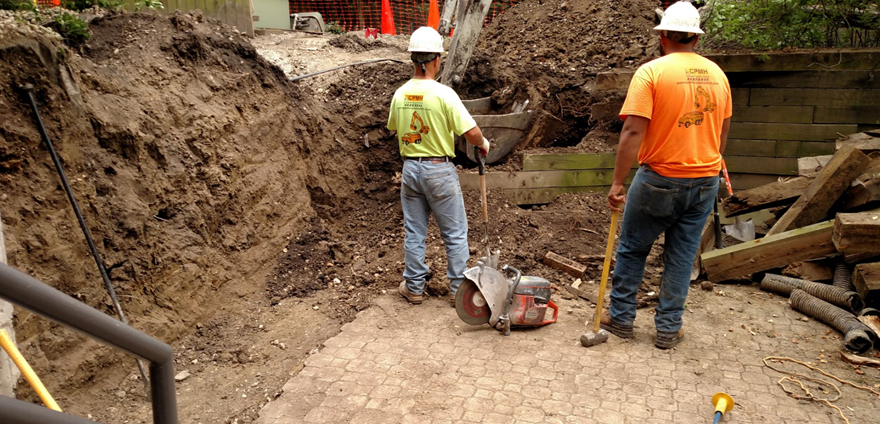
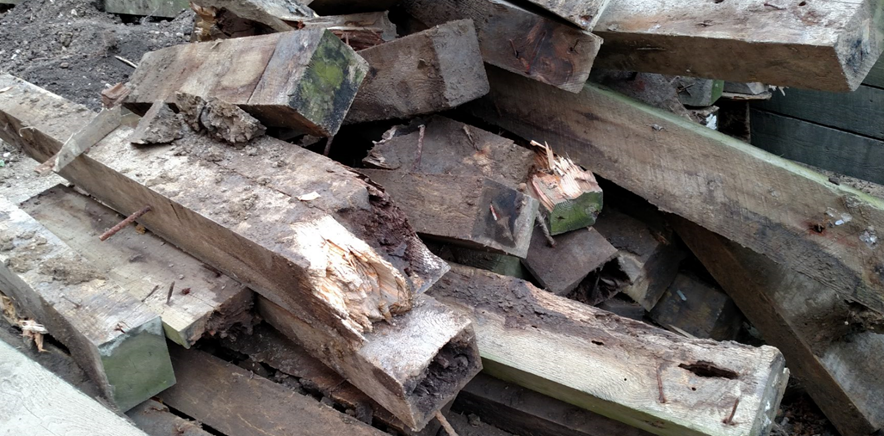
It was obvious that re-erecting the timber wall, as we had planned, wasn’t going to work. We needed a Plan B.
Over the next couple of weeks, we developed different options: New timber walls, precast block walls, modified grading schemes, alternate wall layouts – All of the sorts of concepts in an effort to develop an optimal solution.
We asked the contractor to price-out completely demolishing the timber wall and replacing it with a modular block-type wall:
KABOOM!!!! The contractor’s cost was hefty. Bigger than the condo association thought it would be .
The association has an established decision-making process that must be followed in order to expend funds on behalf of all of the residents, and the Board of Directors would ultimately need to approve the change. We had a coordination meeting with the Board, the contractor & his subs, and some of the interested residents to discuss the retaining wall options. There was a lot of positive dialogue amongst of the attendees. Everyone wanted to solve the problem, get the wall fixed but not spend a fortune on the solution.
One of the residents took it upon himself to develop his own, independent cost estimate for what he thought the wall’s construction cost might be. He did his homework and did a really nice job, thinking & reasoning through the the scope of the job. His assumptions were all pretty consistent with what the contractor had priced, but there was a HUGE disparity between his estimate & the Contractor’s proposed price.
I, of course, formulated my own cost estimate – My costs were somewhere between the Contractor’s price and the resident’s estimate.
Take a guess where that disparity came from? Go ahead, I’ll wait, but you only get 1 guess…..
CONSTRUCTION COST ESTIMATING 101
As a Resident Engineer, one of the early skills that you need to develop is how to estimate the cost of work. For most of us, there are 2 ways to cost work out:
–Unit Prices, or
–Force Account (or Time & Material, however you like to term it).
At the outset I’ll say this: Estimating unit price work is easy. Quantity x price = cost. The magic is in understanding what the unit cost represents, and what the scope of work is for that unit price.
A lot of young engineers want to run to a book to get unit prices. While this might work for developing estimates, it can go sideways really quickly. You MUST KNOW WHAT THE UNIT PRICE IS BASED ON (I think I’ll save this for a future post….)
The other direction for estimating costs is to derive the costs using the various elements that make up the price:
–Labor
–Equipment
–Materials
–Markups / Administration
By using this method of estimation, you quickly develop a better sense of all of the ingredients that go into understanding what the total cost of a unit of work is. How much of each of those ingredients do you need?
Let’s get back to the retaining wall & I’ll drive home the point of this article.
HOW MUCH DOES LABOR COST
When the resident shared his estimated labor cost for building the wall, it was well less than I had estimated. This disparity would be the significant factor is assessing what a reasonable cost of this wall ought be.
I live & work in the Chicago metro area. This is a union town, in a union state. Union labor is expensive. In Illinois (or any union-based state), union labor costs drive construction costs to much higher levels than in open shop/non-union states. Whether you like it or not, it’s a cost of doing business in Illinois…
I don’t think that John Q Public has a firm grasp on the cost of union labor. I could tell that my condo resident friend did not factor union labor into his estimate: His labor estimate was about 25% of what my estimate was.
Listen: Most of us would like to think that, if we hired our son or daughter, or paid two of the neighbors to build us a deck, we’d pay them some cash, right? Minimum wage is, what, like, $8.25/hr. OK, great, I’ll pay them, say, $15.00/hr. Hell, for a couple of days work, that might be like $500 or so, right?
Or let’s go one step further: You might know a guy at church who does carpentry on the side. You could probably pay him $25.00/hr to build you a deck, right. Weekend’s worth of work for he and his buddy as a side-job for them, so maybe the deck ends up costing us $1,000 or so, right?
Well, when it comes to working in a state that has union labor & prevailing wage rates, the numbers shoot skyward.
Let me show you something from my toolbox to explain it.
ESTIMATING WORKSHEET
In 1996, I built the first version of a spreadsheet that I use to calculate construction costs. It is one of my “Pride and Joy” tools in my toolbox. This sheet has gone through, probably, 100 tweaks, updates & variations, to enhance its functionality & accuracy.
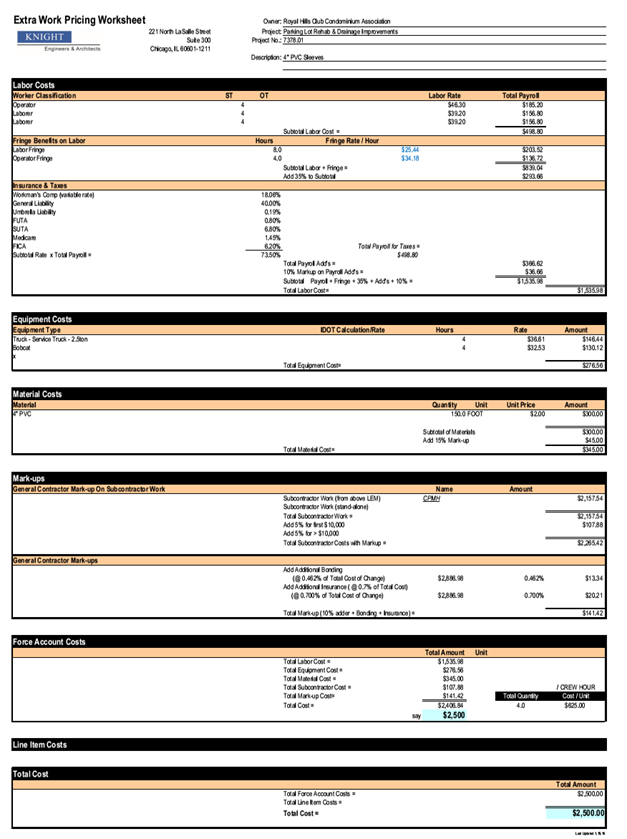
The underlying premise & function of this sheet is to assemble all of the individual components required in a work effort, and boil them down into an anticipated cost. That cost can then be summarized as a unit cost, or an hourly crew cost.
You will often-times hear construction people have “plugs” for certain cost elements, such as a unit cost being comprised of 50% labor + 50% machines & materials.
I’m not a big fan of plugs. I don’t like them. They rely on someone else’s assumptions. They might be useful. They might be good for “ball-parking.” But the propeller on my tin foil hat doesn’t allow me the ability to just go along with an assumption, I like to know & understand the derivation.
That’s where this worksheet comes in. It details out ALL of the potential costs. To understand a cost, you really need to know the ingredients to the cost.
So let’s get back to labor costs.
When our resident “plugged” his $2,000 estimated labor cost for building the wall, what was the basis? He was, essentially, a construction estimator who made some assumptions, but what were his assumptions?
The answer to that question really isn’t important. I want to know what “the real number” is. I liken it to knowing the car dealers purchase price, not the window sticker price.
When we talk about labor costs, most “citizens” have no idea how expensive skilled, union labor is. As I have it calculated in this example, just take a look at the “Labor Rate” and the “Fringe Rate” for a typical card-carrying operator working in Illinois: A machine operator earns roughly $50/hr, and if you add in his/her fringe benefits (like medical insurance, retirement funds, etc.) it’s more like $85/hr.
But we’re not finished there. The company that the operator works for also has costs that need to be considered, like the the company’s home office expenses, the rent & utilities in the home office, and other overhead costs that need to be covered. The Illinois DOT pays for these costs by adding a 35% markup to the workers’ rates.
And wait, we’re still not finished. The governments & insurance companies need to get their slice of the income. Federal & state taxes, Medicare & Social Security as well as the various types of insurance that a contractor needs to maintain to stay in business all need to be paid. In this example, those costs add ANOTHER 73% markup to the operator’s hourly rate.
So, at the end of the day, even though the operator makes $49.30/hour as what he receives in his paycheck, the actual cost to have him work on your job is more like $155.00/hour when you consider all of the other costs associated with his 1 hour worth of work.
Pretty amazing, isn’t it.
CARRYING THE MESSAGE ABOUT COSTS
So, rounding out this story, John Q. Public typically doesn’t usually understand how expensive construction labor can be. Most people understand the concept of skilled labor and the inherent value that it brings, but when we talk about all of the other “soft costs” that are associated with having a Contractor provide a service, we need to be able to explain why the costs are what they are.
In my case of the condominium retaining wall, I think I was able to explain why there was so much disparity in what the resident thought the labor costs what we should be anticipating them to be. It’s hard to argue over costs when you already have the car dealer’s purchase order in your hand.
Lesson Number 1: Always know and understand the details of what you are costing. I’ve said it in dozens of articles, and I know I’ll say it in dozens more: You need to dig deep into the details of your work. Understand, not just some, but ALL of the costs associated with an operation, an installation, an alternative. Be in a position to intelligibly explain your assumptions. It will force the conversation about the cost of the work to real, tangible elements that will be required, not just a bunch of “pie in the sky” round plug numbers that someone pulled off the internet.
Lesson Number 2: Always be able to boil-down concepts for your private clients. It takes time to develop your acumen in being able to articulate engineering concepts to people who are not as experienced in the industry as you are. Remember who your audience is. Break concepts down. It may require you to take extra steps in how you present costs, or concepts or the logical progression you used to develop a solution. Be an educator of your client. They will appreciate it for sure.
And oh, by the way, the retaining wall turned out great!!!

Thoughts? Comments? Questions? Hit me up anytime.
Be the first to comment